CleanUp Tasks
By Trados AppStore Team
Free
Description
Modify source/target, lock segments and delete tags with custom batch tasks.
You can find an excellent explanation of how to use this tool on the developers website.
Technical details
4.0.0.1 - Trados Studio 2024
Changelog:
- updated to support Studio 2024
- updated TellMe features
Checksum: 967fe7885098ba35a65ebbeccfc092965416d637aa0ff1b14cbe8c383e3cc474
Release date: 2024-06-25
3.1.1.0 - Trados Studio (2022 (SR2), 2022 (SR1))
Changelog:
- Addressed breaking changes
- Sdl.Core.Globalization (Modified)
- Sdl.Core.Globalization.Async (Added)
- Sdl.Desktop.Platform.Controls.Behaviors.MouseDownBehavior (Deleted)
Checksum: 5a42f56771edb904071c28c03ae73b08623a43deb94b01369ecd772f0bc4fe47
Release date: 2023-06-21
3.0.2.1 - Trados Studio 2022
Changelog:
- Corrected updated plugin manifest to ensure that the plugin will not attempt to install into Trados Studio 2022 SR1. This is important because the SR1 release contains breaking changes that will cause this version of the plugin to prevent Studio from starting. There will be a further update of this plugin specifically for the 2022 SR1 release either alongside, or shortly after SR1 is made publicly available.
Checksum: cbc674214c8e6e8f62c7c299f8de761fb37216e7987e680ce08e9c43ce9ac000
Release date: 2023-06-06
2.9.9.0 - Trados Studio 2021
Changelog:
- updated studio maxversion to 16.9
- updated author to "Trados AppStore Team"
- updated NuGet dependencies to the latest versions (HtmlAgilityPack, Sdl.Core.PluginFramework, Sdl.Core.PluginFramework.Build)
Checksum: c2f0fb5407b4c318adb1bda0d19fb0e8b3f44ea666c19664e6e55037ba8d2818
Release date: 2022-04-26
1.9.8.2 - SDL Trados Studio 2019
Changelog:
- Updated version for 2019 to prevent installation into 2021
Checksum: 3aa24be7eddb47e2ee0743ebce7984c56646ce1eaf7635fdea176d5ee15afb85
Release date: 2020-07-06
1.8.5.0 - SDL Trados Studio 2017
Changelog:
No related information.
Checksum: f799f044d80ef6f029abde904d09d3014f034bf1f5b68ad48a3362e37397b84a
Release date: 2020-03-10
Support website: https://community.rws.com/product-groups/trados-portfolio/rws-appstore/f/rws-appstore
Shared products:
Trados Studio 2024
4.0.0.1
- updated to support Studio 2024
- updated TellMe features
Trados Studio (2022 (SR2), 2022 (SR1))
3.1.1.0
- Addressed breaking changes
- Sdl.Core.Globalization (Modified)
- Sdl.Core.Globalization.Async (Added)
- Sdl.Desktop.Platform.Controls.Behaviors.MouseDownBehavior (Deleted)
Trados Studio 2022
3.0.2.1
- Corrected updated plugin manifest to ensure that the plugin will not attempt to install into Trados Studio 2022 SR1. This is important because the SR1 release contains breaking changes that will cause this version of the plugin to prevent Studio from starting. There will be a further update of this plugin specifically for the 2022 SR1 release either alongside, or shortly after SR1 is made publicly available.
Trados Studio 2021
2.9.9.0
- updated studio maxversion to 16.9
- updated author to "Trados AppStore Team"
- updated NuGet dependencies to the latest versions (HtmlAgilityPack, Sdl.Core.PluginFramework, Sdl.Core.PluginFramework.Build)
SDL Trados Studio 2019
1.9.8.2
- Updated version for 2019 to prevent installation into 2021
SDL Trados Studio 2017
1.8.5.0
No related information.
Important Note:
Please note that there is a possible scenario when using this application where you may find you are seeing results and information in the user interface (UI) that don't seem to match the project you are working on. It is not possible to change this behavior using the APIs that are currently available in Studio without completely rewriting the application to work in another way. So for now it's important that you note the following.
If you are working in the "Files View" and you have managed to activate a project in the "Projects View" which is different to the project belonging to the files you are working on, the Cleanup Tasks batch task will not work as expected. This is because the batch task will be applied to the files you are working on, but the information used to perform the task within the UI will be drawn from the active project. For example, this is what I'm expecting to see for the project I am working on:

But as I have managed to activate a different project altogether in the "Projects View" these are the settings that are being used:

It is more likely that this could occur when you open a single file for translation. When you select "Translate Single Document" your document will be opened in the editor but the active and highlighted project in the "Projects View" may still remain highlighted and influence the batch task as described above.
So before starting the CleanUp Tasks while in the "Files View" or the "Editor View" make sure that the CURRENT project is also active, HIGHLIGHTED.
The content below was mostly provided by Jesse Good in his original article on this plugin.
So what does this tool do?
- You can lock segments based on structure or content
- You can remove unwanted tags in the source
- You can modify the source or target text as you like and create “settings” files for easy reuse
- You can create tags for embedded xml or html content
- You can create placeholders for fixed words or phrases
Some of the above is possible already with other tools, but the best part is this is a Batch Task, so you can run it directly in Trados. If you think any of the above may be of interest, please read on.
New Batch Task Menu Items:
The tool adds 2 new items to your batch task menu:

Cleanup Source
When you click on Cleanup Source and then hit “Next”, you will be greeted with the following screen:

Locking segments

You can lock segments based on search expressions using the left-hand box (the Content Locker). In order to lock based on the document structure, use the right-hand box (the Structure Locker).
Content Locker Example
I mainly translate from Japanese to English and often times you get segments that contain no Japanese characters. It can be useful to lock these sometimes, the following regular expression would check for that: ^[^亜-熙ぁ-んァ-ヶ]+$

Make sure you turn on Regex for the above to work
The headers in the above screenshot are abbreviated for space reasons, so they might be a little difficult to understand:
- Regex: Regular expression matching
- Case: Case-sensitive searching
- Whole: Whole word matching
Structure Locker Example
This should be straightforward, the structure info is read from the sdlxliff files of the project. The example file I used happens to be an Excel file, which is why you see items like sdl:worksheet and sdl:textbox. In the following screenshot I selected sdl:textbox to lock any text that appears in text boxes.

Removing tags
The plug-in divides tags into two categories, Formatting Tags and Placeholder Tags:

- Formatting Tags: These always start with
<cf>.
<cf> tags can contain a range of information such as font name, font size, italic, bold, etc. In Example 1 below, each tag contains the font name and size only, while Example 2 contains an italic="True"attribute.
Example 1 (Font Name and Size):

Example 2 ( italic ="True")

In order to remove the tags in Example 1, you need to select Font Name and Font Size (see screenshot below), since the tag specifies both of these:
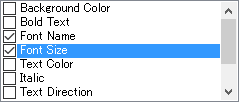
However, the tag in Example 2 will not be removed as it contains italic="True". To remove this tag, you also need to select Italic:

- Placeholder Tags:
In short, these are the <ph> (Placeholder) tags in the sdlxliff file. Sometimes they contain inline formatting which may not be needed.
I would exercise caution when removing these tags though as often times they are necessary!
In the following screenshot, the <br> tags are used for aligning text in text boxes in the original Excel file, they are probably required, but there might be times when you want to remove this type of formatting.

Currently, I do not permit removing other types of tags other than the above. Let me know though if you have a use case for removing other types of tags.
Modifying text
Now to the main part of the plug-in. When you first start out, you will have an empty screen like below:
![]()
First, click on the New button to create a new “Conversion File”.
The following window should pop up and it will appear blank at first:

Click the “+” mark in the top right corner as shown and a new row will be added to the grid like so:

Now, I would like to demonstrate a few use cases to show how to use the tool.
Use Case: Converting wide characters to their narrow equivalent
In Japanese text, wide and narrow forms of characters are used:
WideNarrowABCDABCD12341234カタカナカタカナ
One issue is that, depending on the client, they may use different forms in their documents. You may even find a mix of these forms in the same document. These mixed forms can also cause problems with your matching results, and your translation memories will be cluttered with them.
One solution is to unify these forms before translation:
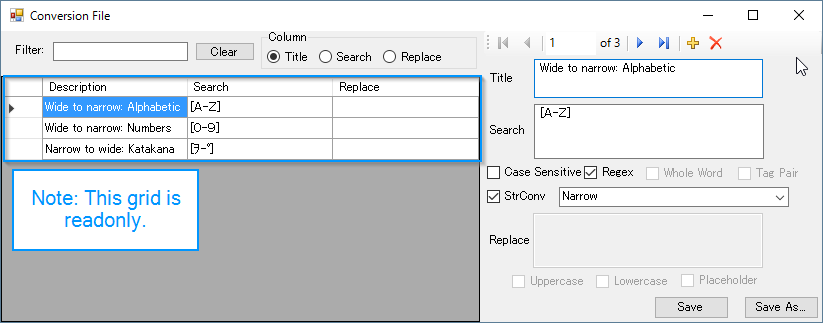
In the above screenshot I have created 3 rules:
- Wide to narrow: Alphabetic
- Ensure all alphabetic characters are narrow
- Wide to narrow: Numbers
- Ensure all numbers are narrow
- Narrow to wide: Katakana
- Ensure all Katakana characters are wide
To create a rule, you enter your information in the input area shown below:

- Title: This field can be left blank, it just gives a description of the search item, and allows you to find an item easier in the grid view.Search: The text you want to search for. In the example I use a regular expression to search for a single wide alphabetic character, it probably would be more efficient to use
[A-Z]+to search for groups of characters though.Search Settings: The search settings explained from left to right are:
- Case Sensitive: Case sensitive searching
- Regex: Use regular expression matching
- Whole Word: Match whole words
- Tag Pair
- Embedded Tags
- StrConv
Embeded Tags
A common issue with translations, is handling embedded tags.
For example:

The cleanup tasks tool provides a way to convert these into “real” tags.
You could use the following setting:
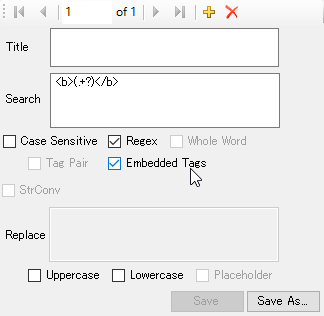
The above setting will detect the <b> tag in the example.
When you run the task on the example, it will be converted as shown below:

Important Note: Note that in my example, I did not show a setting converting the <span> tag. This is important, as even though I only created a rule to detect the <b> tag, the plug-in will convert all tags it finds within the segment.
Now, when you generate the target translations, any converted tags will be restored to their former form:

StrConv
StrConv happens to be a handy method from Visual Basic. You can find it in a lot of Microsoft Products, such as Office VBA.
The handy part is shown in the following screenshot (courtesy MSDN).

All the options above are available under their same names in the tool: By selecting Narrow in the tool, I can convert any wide character to its narrow equivalent.

When you turn on the StrConv option, the Replace window becomes greyed out.
Storing conversion files for reuse
One problem I have found with current solutions, is there is little ability for reuse. For example, SDLXLIFF Toolkit is a great tool, but you have to retype each item you need to search for. With this tool, click Save As in the bottom right corner to save your settings file for later use:

Once you have saved your file, it will appear in the following list.
Important Note: Order matters! Each file will be used for processing starting from top to bottom.

I would recommend creating separate conversion files based on project, or divide them into categories.
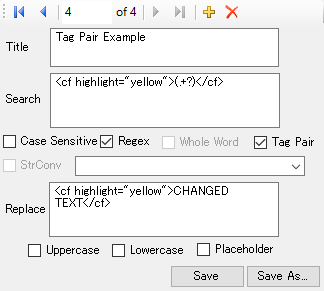
Tag Pair
I actually don’t know how useful this feature will be, but you can detect tag pairs in the source text and modify them.
For example, in the following screenshot, I look for a <cf highlight="yellow"> tag and replace the contents with some random text:
Another example is taking a tag pair and replacing it with a placeholder instead:
Say you had the following made up <inline> tag pair in your XML file:

With the following rule (make sure placeholder is turned ON!):

You can turn it into a placeholder:

However, placeholders have a much more useful application, which will be discussed next.
Placeholders
The main use case for placeholders I see is marking proper nouns, such as product or company names that never change in a translation.
For example, imagine a company named Contoso as below:

You can mark these as placeholders with the following rule:

Note: You can create placeholders that do not use attributes, for example in the above, I could of made the rule <Contoso /> instead. However, when using elements only, you have to make sure it is a valid XML name.
This will take each instance of Contoso and replace it with a placeholder:

However, when you do this, a few issues come up:
- You will notice it replaced
Contosoin the third example, but left the, Ltd. In other words, you have to be careful what you replace. To fix this problem, you could create a rule that replaceContoso, LtdbeforeContosoor use regular expression to match both versions. - Having placeholders is great for translation purposes, but you want to return these to their original forms when generating the translation. This functionality is part of the next section,
Cleanup Target and Generate Files.
Cleanup Target and Generate Files
This is the second batch task, which allows you to run modify text in the target and generate the target translations. The settings screen looks like this:

Save Folder
If you want to generate the target translations when this batch task is ran, click Generate Target. You can also specify where the files will be saved. The default is the Desktop.

Backup Folder
Before generating target translations, you can save the sdlxliff files to a backup folder. Click Make Backups to make this happen. You can specify the folder to save them, and if not, by default a folder called Cleanup Backups is created in the project.
Also, if you click Preserve Placeholder Tags, the backups you make will overwrite the original sdlxliff files in the project.
Preserve Placeholder Tags
If you have been following along, under Placeholder we converted some proper nouns into placeholders. The problem is that when you generate the target translation, if these placeholders appear in the target segment, they will remain as a tag, or even worse be ignored completely when generating the translation. In order to solve this problem, any placeholders created during Cleanup Source will be stored in the project file so that they can be returned to text when generating the translation.
It is an automatic process, but when you run Cleanup Target and Generate Files, if a stored placeholder is found in the target segment, it will be converted back to plain text.
This is all done by convention, so if the placeholder was <Contoso />, it will be replaced with simply Contoso. When using attributes, the placeholder will be replaced with the contents of the attribute, so <Locked Name="Contoso" /> will be replaced with Contoso.
Before

After

Automating the Process
They key to any successful translation workflow is Automation, the more we can automate, the more we can focus on the important stuff. Now for this Batch Task Plug-in, you can create a custom sequence so that this is ran automatically during project creation. However, there is an important point that you need to be aware of when doing this:
Segments are not generated until the Pre-Translate Files task is ran, so you need to make sure Cleanup Source appears after that.
This is somewhat limiting though, as Cleanup Source may affect matching. I will look into other options when I get a chance.

Reports
Also, note that the tool generates reports and log files of what it does!
The report itself (shown below) does not give very much information, only a count of each item and a path to the log file. The log file itself though will contain a lot more detailed information about what happened, so if you need to find out why something changed, please look at the log file. (I considered adding all the info about what happened to the report here, but I found the size of the report gets too large quickly.)
Example:

Note: I wanted to create links so you can just click on it to open the log file, but I haven’t figured it out. I asked a question on sdl community about it.
Updating Formatting Attributes (Experimental Support)
There is current partial (read as “very limited”) support for updating formatting attributes.
For example, with the following text:

If you create the following rule (note how I changed yellow to blue):
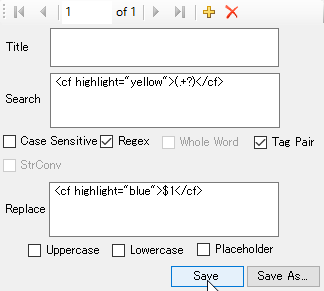
You can update the color of the highlight:

However, there are a lot of issues with this feature that need to be worked on, so I advise against using it except for experimentation. The biggest problem stems from the fact that you need to understand the underlying file type to update the formatting in the generated target file.
For anyone interested, all source code is published here.