In this document we will explain how to create a custom keystore and import the CA certificate and matching key pair allowing SSL support on Tomcat Embedded as used on SDL Micro-services.
The Keystore steps are general and may be used for any CA Certificate support on Java.
A word before start.
On SDL site, we already have a documentation explaining similar steps while using self-signed certificate.
The steps we will use here are in concordance with Oracle documentation regarding the classic keystore limitation while using CA certificates:
In a real working environment, a customer could already have an existing private key and certificate (signed by a known CA). In this case, JKS format cannot be used, because it does not allow the user to import/export the private key through keytool. It is necessary to generate a PKCS12 database consisting of the private key and its certificate.
Applying these steps for someone not doing this regularly like me takes approximately 30 min. It's more a question of being focus on what we do than being difficult.
Using SSL allows you to encrypt the data communication between the different parts of your content delivery and/ or publishing site. It may be a requirement on your environment if you are running a commercial site or manipulating personal and sensitive data.
If you already have configured your content delivery using HTTP and want to move to SSL you will need to uninstall/ reinstall the services and update your discovery database. Advised would be to use a fresh discovery database and re-install the services using "-auto-register" switch for each one.
OpenSSL is necessary for these steps. it's normally already installed on a Linux/ Unix environment and you can download the Windows package from this link.
The Steps:
- Creating the keypair
- Create a certificate request (*.CSR)
- Generate CA certificate
- Exporting the key entry
- Obtaining the certificate authority certificate
- Importing the key entry into the keystore
- Configuring Application Server for SSL communication
1) Create the keypair.
We will use openssl and java keytool in these steps to create the necessary environment.
openssl genrsa -des3 1024>myPrivate.key
This command will generate your private key in the file “myPrivate.key”
Depending from your CA authority, the encoding (-des) and encryption bytes (1024) can be different.
Keep the private key in a safe place. The SSL communication is compromised if the private key is known by someone else.
Details about genrsa parameter can be found here .
2) Create a certificate request
We now create a Certificate request using the private key we created on step 1
openssl req -new -key ./myPrivete.key>myCertificate.csr
The certificate request and the key pair is created.
3) Generate CA certificate
- Edit the file “myCertificate.csr” in a text editor and copy the entire content
- Open your browser to your CA authority site follow the steps to request a new certificate
- When prompted paste the “myCertificate.csr” content into the enrollment form
- Complete the form and save it.
- Your CA authority will mail you the certificate or provide a link to retrieve it.
4) Exporting the key entry
The certificate and the private key need to be exported so that they can be transported and imported into other keystores. Export the certificate and private key pair into PKCS#12 format.
openssl pkcs12 -export -in cert.cer -inkey $PWD/myPrivate.key -name "CA Cert" -out CA_cert.p12
with this command we export on PKCS12 format the certificate we retrieved on step 3 ( -in) we link it to our private key (-inkey) giving an Alias Name(-name) and save it on file (-out)
5) Obtaining the Certificate Authority certificate
All SSL certificates issued by a CA authority requires the installation of an intermediate certificate authority (CA) certificate.
SSL certificates are signed by an Intermediate CA using a two-tier hierarchy, also known as a trust chain. This enhances the security of your SSL certificates.
You may be required to download the root CA certificate if this is not trusted by the keystore.
If CA intermediate certificates are already installed on your system, you can skip this step.
6) Convert PKCS12 to Keystore
In this steps, we are importing all in once. Indeed, on step 4 we created a PKCS12 file connecting the CA certificate and private key. With the below command we are now converting our PKCS file to a PKCS12 keystore
keytool -importkeystore -deststorepass PASSWORD_STORE -destkeypass PASSWORD_KEYPASS -destkeystore keystore.jks -srckeystore CA_cert.p12 -srcstoretype PKCS12 -srcstorepass STORE_PASS -alias NAME
The STORE_PASS is the password which was entered in step 4 as a password for the pkcs12 file.
The srckeystore is your pkcs12 file from step 4
PASSWORD_STORE and PASSWORD_KEYPASS are password you can create to secure your keystore
7) Configuring the micro service to enable SSL
- To enable SSL on you micro-service we will now copy the keystore created on step 6 to a location accessible from your server installation.
- In your micro-service installation config folder edit “application.properties”
- Add the following lines at the bottom:
server.ssl.enabled=true
server.ssl.protocol=TLS
server.ssl.key-alias=NAME
server.ssl.key-store=PATH/TO/YOUR/KEYSTORE.JKS
server.ssl.key-password=STORE_PASS
Depending from your environment, more keys may be necessary like
server.ssl.trust-store= # Trust store that holds SSL certificates.
server.ssl.trust-store-password= #
See the official Spring documentation for a complete overview of available options on enabling SSL
Now your server has been configured start the service using start.ps1 on MS-Windows or start.sh on Linux/Unix.
Check your service starts indeed properly and browse to your micro-service address using https
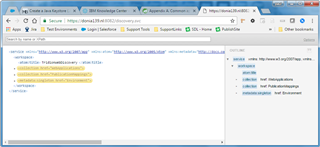
i.e: https://myserver.net:8082/discovery.svc
If all works, then you should see a green lock on the address bar
And the data should display accordingly

 Translate

