


Introduction
Hello again! After few months of development, we're happy to present new version of TBM - 6.1. We have focused on multiple areas, like UI improvements, new features in the outsourcing and quoting areas, huge performance improvements, etc.
Full set of all changes implemented in version 6.1 can be found in this Community article.
Video
Here is a video where all features listed below are demonstrated in detail.
UI customization
This feature allows to slightly adjust TBM look to your preferences. From now, you can change the following presentation options:
- Font color
- Font size
- Font family
- Date and number formatting culture
First three settings can be accessed via a new button added in the top toolbar:
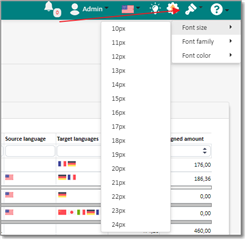
From here, you can quickly select font size, font family (we have added 15 most commonly used fonts) and font size. All selections made in this menu will be immediately reflected in UI.
To change dates and number presentation culture, please use language selection menu:

TBM automatically determines formatting culture based on your browser settings (or selected UI language). However, sometimes these preferences may differ, and you may wish to use TBM in one language, but format dates and numbers according to other rules. In such situations, you can use this functionality and adjust formatting culture as needed.
Vendor time management
This is the largest new feature in this release, consisting of many changes throughout the whole application.
The goal is to establish some grid of availability slots of your vendors, so you exactly know volumes which you can assign to them at any period of time (in other words, to know if you can assign one or another vendor to meet deadline of upcoming project).
To start working with this feature, open any vendor profile, switch to the Settings tab, and find Productivity group there:
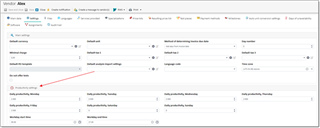
This group of settings allows to specify average volume which vendor may handle by default. Values can be provided individually for each day of week (some vendors may prefer to work on weekends or have days off during default week). If all values are empty, the system will take productivity value from the global application settings. Last two parameters here are workday start and end times, which should be specified in a vendor’s time zone. Length of work day and daily productivity allows the system to calculate hourly productivity.
Unavailability days tab allows to specify exclusions from a default productivity grid.
After you have specified productivity settings, you can start using it. Open any translation assignment and click Search icon near Vendor field. Vendor search dialog now has more information regarding possibility to use one or another vendor:
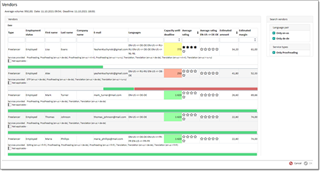
Capacity until deadline column displays average volume which vendors can handle until assignment deadline. Depending on difference between assignment average volume and available capacity, cell background will have one of three colors: green (can handle), yellow (can’t handle, but difference is less than 10 percent) or red (can’t handle).
At the bottom of each row you will find small timeline showing vendor’s availability according to existing assignments, free days and unavailability days. Each cell on this timeline represents time window and its status: free (green) or busy (red). By hovering mouse pointer over a cell, you can find out start and end times, average volume and, in case of red bar, reason why a timeframe is occupied (assignment, free day, etc.).
So, vendor search window now helps to determine if you can use one or another vendor for a particular assignment.
When a vendor is selected, and you save an assignment, Time Tracking tab gets filled with planned work times. Application calculates these values based on vendor availability data, starting from assignment deadline time (not from assignment start time). Such approach allows to keep earlier time slots free for a vendor, so if you get more urgent assignment later, system will know that a vendor which is used in later assignments can still be used for a more urgent one.
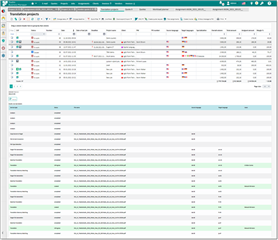
Another part of this functionality is a vendor workload planner report, which can be found under Scheduler and planning section of the navigation menu.
This report allows to represent vendors' free and busy times on the timeline. You can specify start and end dates of a period, filter vendor list by different criteria (for example, select specific vendor, language pairs, or statuses of ongoing works).
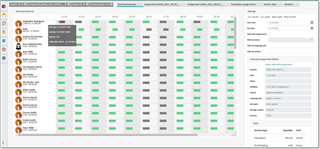
The first column of the report displays vendor names and their photos. Additionally, under the name you will find two numbers: the first one shows average volume processed, while the second one represents maximum average volume in a specified period which vendor can deliver according to the productivity settings.
Main area of the report contains timeline which you can scroll horizontally. On the timeline, you will find separate columns for each day of a specified period, with colored blocks representing availability type: green (available), grey (unavailable) and red (busy on assignment). Hovering mouse pointer over red block allows to view a tooltip with brief information about assignment, and clicking on this block will populate detailed assignment data on the right panel. This way, you can see date and deadline of an assignment, its status, amounts and list of included tasks.
At the bottom of the vendor list, you will find totals showing average volumes in work and available volume for all displayed vendors. By applying filters, you can, for example, quickly find out volumes which you can process in a specified time period in a certain language.
Quote planning
When you're creating a quote, sometimes it's not only about applying some price-list to a list of tasks created based on analysis report generated by a CAT tool. In certain cases, you may wish to estimate possibility to meet tight deadline, or possibility to offer discounts without making a margin negative. To solve such tasks, TBM has quote planning dialog, which allows to select vendors and estimate expenses and nearest deadline. UI of this tool is almost identical to the project planning tool, but with a few differences.
To open quote planning dialog, fill-in all the necessary details of a quote, including target tasks. When you're ready, click Quote planning button on the toolbar. The following dialog appears:
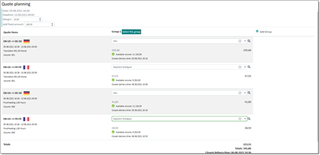
Top bar displays quote start and delivery dates, as well as a field to specify desired margin and fixed expenses.
Next, you will find a table, where the first column contains a list of quote items, with information about language pair, service type and average volume.
Then, you can create multiple columns on the right with different sets of vendors. You can select vendors from the drop-down list or click Search button to open separate dialog to pickup vendors, which contains more data comparing to the drop-down list, including recommendations. When you select any vendor (or all vendors in a column), application will show available volume of a selected vendor and an icon showing if selected vendor should be able to meet a deadline. Totals below each column inform you about closest delivery time based on selected set of vendors, as well as total estimated amount.
If you wish to adjust prices which are currently applied in your quote according to values selected in the quote planning tool, click Select this group button in the column header (so this column will be highlighted), and click OK.
If you have entered fixed amount at the top bar, this amount will be equally divided across all quote items (by average volume) and added to prices, respectively.
Selected vendors will be pre-saved, so when a quote is accepted, TBM will not only create a project and jobs, but also translation assignments with pre-selected vendors.
Improved customization capabilities
In this release, we have increased usability of powerful customization features TBM provides. We’re talking about custom dashboard layouts and list view customization. Remember, in previous version, to edit a dashboard, you had to open 2 separate tabs: one with dashboard layout and another one with list view customization window. Optionally, user had to open third tab to preview resulting dashboard. So, we have improved this. First of all, dashboard layout customization page now has preview mode selector, which allows to quickly switch between schematic and final views:

Schematic view works faster, and saves space, while Real data view allows to see how final dashboard will look like. After switching to this mode, you can modify your widgets, and all changes will be immediately reflected in the preview.
Next improvement here is dashboard widget configuration dialog, which you open by double clicking on an item in the list in the left, and here is how it looks now:
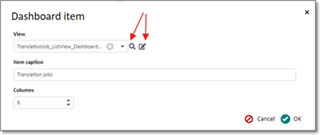
We have added two buttons there: one allows to preview selected view, and another one allows to edit it on fly! Of course, if selected view is not predefined one, because predefined views can’t be edited. So, you can click this button, quickly add/remove/reorder columns, click OK, and you have edited widget! Subjectively, this saves maybe 300% of time we spend on dashboards customization comparing to previous version.
And last improvement here is the new tiny button in all list views:
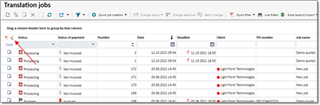
If you need to make any changes in a current view (again, add, remove, reorder columns), there is no more need to open list views page from settings, find a view, edit it, return back to your view. This button will open a dialog allowing to quickly edit currently used view. From our experience, more than 90% of users use list view customization functionality, so this addition will be beneficial almost for all TBM users.
Studio Live integration improvements
In this release, we have not only added highly-requested possibility to assign users to Studio Live tasks from within TBM, but also implemented additional functionality to track project progress.
First of all, under RWS > Trados Live menu a new item was added: Manage project assignees. It opens the following dialog:
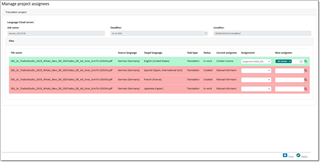
In this dialog, you will find list of all files from the Studio Live project, along with language pairs and current users assigned to tasks. Last two columns allow to select assignments created in TBM and vendors. When dialog loads, TBM tries to determine assignments from a selected project which correspond to Studio Live files. If such assignments are found, they will be automatically selected in the Assignment column, as well as vendors will be selected in the New assignees column. The only requirement here is that vendor should be linked with Studio Live user, which can be done from the vendor list.
Another improvement in Studio Live integration is possibility to track project status. To use it, select any project linked with a Studio Live project in the project list. In the result, TBM will load list of all remote project tasks and display for you, highlighting tasks which are now ongoing:
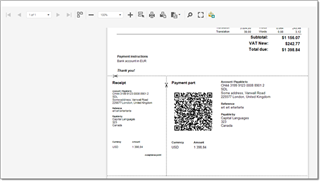
Swiss QR invoices
Now, from the invoice list, you can use new template (Invoice_CH), which layout corresponds to established rules and includes QR code according to official documentation:
Notification categories
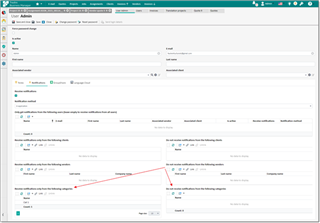
We have added Category column to the list of message templates, so now you can categorize messages (in other words, notification types).
Then, under user profile, you can control which categories of notification a user should receive or not receive:
Custom notifications
If you want to mark certain entity (document, vendor, customer, report) to return to it later at certain time, or simply create some notification for yourself or other application users, this is now possible.
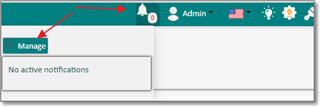
In many detail views you now have a button to create custom notification:
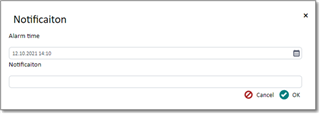
It opens a dialog, where you can enter notification text and alarm time:
However, if you wish to create a notification for other users, you can go to the list of notifications:
From this list, you can click New to create a new notification, and open the following form:
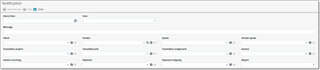
Here you can specify alarm time, target user, notification message and select one of supported entity types (if any). If you select any entity type, then when notification appears, user will be able to click it and immediately move to a selected entity.
Third nested property editor in custom filters
In previous version, visual filter builder had only 1 nested property of complex property available for selection. If that selected nested property was also a complex property, you were not able to provide value for that property. Good example here is list of jobs and attempt to filter by language pair:

When you add a filed (Language pair), you can select nested property (Source language, for example), and application didn’t allow to select how to filter by that property, because it’s not possible to filter by SourceLanguage; instead, you may wish to filter by SourceLanguage.Name or SourceLanguage.Iso2. Now we have added additional layer of nested properties, so you can build more complex filter strings, like this:

In the example above, we have selected LanguageCombination, then SourceLanguage, then Language code property, and specified value of that property, so list of jobs is filtered by language pairs, where source language ISO code contains 'en'.
Improved file selector
When creating assignments from jobs, or jobs from projects, or emails from assignments, application displays a dialog to user which allows to select files attached to an entity being created. List of files in this dialog is populated based on source entity from which we call a specific function. For example, if we create an assignment from a job, then list of files will include job files, base project files, and files from other assignments belonging to the same project. In a new version, we have visually separated these sources, allowing users to easier navigate and select files, where files from main entity are displayed first, followed by less prioritized entities, like this:
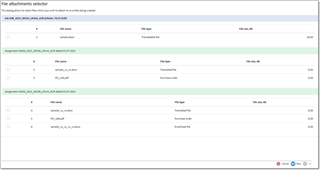
Additionally, bottom toolbar got Skip button. It allows to continue with object creation without attaching any files, while Cancel button will fully abandon the process (previously Cancel worked as Skip).
Hide files from portals
This small checkbox in the file editor allows to hide a file from client or vendor portal, even if security system allows access to a file. It could be useful when some file has deliverable type, but you still wish to process it somehow before delivering to a client.

Other changes
There are some other minor changes and fixes. For example, we have added few API endpoints, added Required software field to quotes/projects/jobs/assignments, implemented a lot of UI and logic fixes, implemented a number of performance improvements, so we hope that this new release will help to only boost management productivity, but also it will be more stable and fast.
Please continue sending your feature requests, suggestions, bug reports and feedback. In next releases, we plan (but do not promise) to focus on such functionalities as communication (source client > client > managers > vendors cycle), feedback and quality management (TQA, ratings, return of work, etc.), and UI improvements (like direct editing in tables, without modal dialog).

