- Download the most recent build (baccs_online_(vers.nr).exe) from your OOS account
- Install it on the server. The default installation location is: C:\inetpub\SDL PLC\BaccS Team Online\
- Open IIS Manager and do the following:
- create a new application pool
- create a new web application and select installation folder in the Physical path field;
- select the created web-app, click Bindings..., and then provide a domain or subdomain for the application. If necessary, add https bindings as well and select the installed certificate. The current practice is to create the following bindings (for example, for acme subdomain):
http://acme.ibaccs.com
http://www.acme.ibaccs.com
https://acme.ibaccs.com
https://www.acme.ibaccs.com - link the created web app with the created application pool
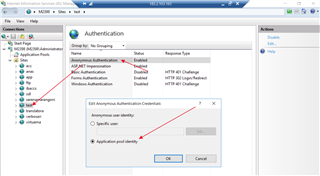
- select the created web-app > Authentication > right click on Anonymous Authentication > Edit > select Application pool identity

- Install your preferred database engine on a server (Microsoft SQL Server or PostgreSQL). This is required.
- Run the Configuration utility from the Start menu > BaccS Team.
- Install the license;
- Provide the database connection parameters: select database type, specify server name (localhost), admin user and password, and database name. Database name can be any as BaccS will create a database if it's missing on a server. Click Apply configuration
- Return to IIS Manager and restart the web-app (and if required the application pool).
- Navigate to the created web-site in your browser. If everything is done correctly the login window will appear. Enter Admin as user name, leave password blank, and click Login.
Trados Business Manager – End of Life Announcement
Trados Business Manager (TBM) has reached end of life. Following the discontinuation of TBM sales on 31 October 2023, all maintenance and support services will conclude on 31 October 2024.
What Does This Mean for TBM Users?
- End of Services: RWS will no longer provide any services related to the installation or updating of TBM.
- Existing Installations: TBM will remain functional where already installed, but the RWS support team will not offer assistance in troubleshooting issues, addressing reported problems, or providing further development for TBM.
- Documentation: The TBM documentation has been removed from docs.rws.com.
- Community Support: The community forum for TBM will remain accessible in a read-only format for users to reference if needed.
RWS Community

 Translate