Glossary Import Error in DeepL plugin 6.1.2.18 Trados Studio 2022 SR2

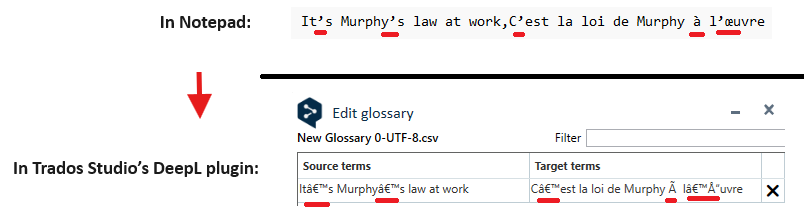
When importing glossaries into DeepL Glossaries, the number of term pairs is limited to just 600.

Attempts to add more term pairs resulted in the error message: "ReadGlossary" failed: Der Index war außerhalb des Arraybereichs."

Here is an example of a functioning glossary with 500 term pairs:

glossmaxtest0500.zip

Here is an example of a non-importable glossary with 615 term pairs:

glossmaxtest615.zip

Since I regularly work with several thousand term pairs in my projects, this limitation poses a considerable problem. 

How can I exceed this limitation of term pairs in a glossary?

Are there alternative solutions or workarounds for this problem?

emoji
Parents Reply Children
  • Karl, can you provide some hints as to what the proper structure is? I've never had success uploading a DeepL glossary in XLS or CSV format and would appreciate some guidance.

    emoji
  • Dear John,
    The following steps are necessary for the successful creation and upload of a glossary for the DeepL plugin:

    1. latest versions of the software: DeepL plugin 6.1.2.18 and Trados Studio 2022 SR2
    2. a list of the term pairs in table format
    3. copy the list into Word as text only
    4. obtain a list of term pairs separated by the tab character
    5. save this list in plain text format with UTF-8 encoding
    6. make sure that no superfluous return character appears at the end of the list
    7. change the name of the generated .txt file to .tsv (tab separated value)
    8. upload this TSV file to the glossaries using the DeepL plugin (Manage glossaries).
    9. Voilá !

    emoji
  •    

    Nice... although I think you can simplify this a little.  I would not use Word at all as most people have a decent text editor which is faster and more suitable for this kind of work.

    1. latest versions of the software: DeepL plugin 6.1.2.18 and Trados Studio 2022 SR2
    2. obtain (or create) a list of term pairs separated by the tab, or comma, character
    3. save this list in plain text format with UTF-8 encoding
    4. make sure that no superfluous return character appears at the end of the list
    5. save the file with either the .tsv (tab separated value) or .csv (comma separated value) extension
    6. upload this file to the glossaries using the DeepL plugin (Manage glossaries)
    7. Voilá !

    I think your detail is excellent for someone taking a glossary from a Word table, and this may well be a common format for many users, but if you were converting from multiterm or any other software then going straight to .tsv or .csv may be more appropriate.

    You can also find this information here:

    https://www.deepl.com/docs-api/glossaries

    Search for "Supported Glossary Formats" as it's towards the end of the page and you'll get right to it.

    Paul Filkin | RWS Group

    ________________________
    Design your own training!

    You've done the courses and still need to go a little further, or still not clear? 
    Tell us what you need in our Community Solutions Hub

    emoji
  • Hi John and Paul,

    Thanks very much for that information about importing glossaries into the DeepL plugin. I have around 600 entries and they import fine now, but I can't get at the Apply button to confirm that I want the entries in there. If I press Alt + Space and move the window, I can make the Apply button visible, but I still can't get there. Any ideas much appreciated. Thanks, Rowan

    emoji
  • IMPORTANT PRECISION (for accented and special characters):

    At the suggested step 3 (or step 2 in the updated version below), instead of UTF-8 encoding, I highly recommend using UTF-8 with BOM, otherwise all accented and special characters (including the curved apostrophe, used even in English) will be corrupted, as illustrated below:

    Top screenshot showing text with corrupted characters, 'It s Murphy s law at work,' indicating encoding error.

    So, to recapitulate, here is an updated version of what  said:

    1. In the latest version of the software (DeepL plugin 6.1.2.18 and Trados Studio 2022 SR2), obtain (or create) a list of term pairs separated by the tab, or comma, character.
    2. Save this list in plain text format using “UTF-8 with BOM” encoding.
    3. Make sure that no superfluous return character appears at the end of the list.
    4. Save the file with either the .TSV (tab separated value) or .CSV (comma separated value) extension.
    5. Upload this file to the glossaries using the DeepL plugin (Manage glossaries).

    ALTERNATIVE STEPS IF IMPORTING A GLOSSARY CREATED WITH DEEPL IN THE FIRST PLACE
    Also, one thing to know is that if you first create your glossary with DeepL's web interface, terms will probably include superfluous straight quote brackets. So, in order to convert the .CSV file that will be exported from DeepL web, here's what I suggest:

    1. Right click on the .CSV file and select either “Edit in Notepad” or “Open with” > “Notepad”.
    2. Search and replace the " character by nothing.
    3. Make sure that no superfluous return character appears at the end of the list.
    4. Save the file in plain text format using “UTF-8 with BOM” encoding; once saved, it will normally retain its .CSV extension.
    5. Close the file in Notepad, and upload it to the glossaries using the DeepL plugin (Manage glossaries).
    emoji


    Generated Image Alt-Text
    [edited by: RWS Community AI at 3:25 PM (GMT 1) on 11 Jun 2024]
  •  

    I like the belt and braces approach... although interestingly I don't need to add the BOM in my text editor.  I just save it as UTF-8 and that is enough.  Definitely doesn't hurt though so thank you for this improved suggestion.

    Paul Filkin | RWS Group

    ________________________
    Design your own training!

    You've done the courses and still need to go a little further, or still not clear? 
    Tell us what you need in our Community Solutions Hub

    emoji
  • Dear Karl,

    Thank you so much for posting your step-by-step instructions!

    I finally got around to trying them and they worked perfectly.

    Best,

    John

    emoji