

This blog post will describe how you can get started to develop connectors using the Tridion Integration Framework. It will describe step-by-step on how you generate connector projects for Java and .NET and how to install & configure connectors.
Introduction
The Tridion Integration Framework (TIF) is a new framework for writing connectors on the SDL Tridion DX platform. It was first made available in SDL Tridion Sites 9.1. Currently we are looking into how to make the framework available for SDL Tridion Docs as well.
TIF is agnostic framework that allows deployment both on Content Management and the Dynamic Experience Delivery (DXD) side. The framework is also agnostic to programming languages. Currently C# and Java is supported, but other languages might be supported in future versions.

In SDL Tridion Sites 9.1 you can write connectors that can be consumed by External Content Library (ECL) and the Public Content API (PCA). More extension points will follow. Via the ECL extension point connectors will appear as a mountpoint on the same level as Tridion native content in the Tridion Content Manager. This allows you to consume external content, multimedia & other external data in the same way you do with native content. In PCA the connector will be exposed through GraphQL allowing you to perform various CRUD, list and search requests towards the external system/service.
There are currently commercial TIF connectors available to Aprimo DAM, SAP Commerce Cloud and Salesforce CRM. More are coming later this year.
Installing Connectors
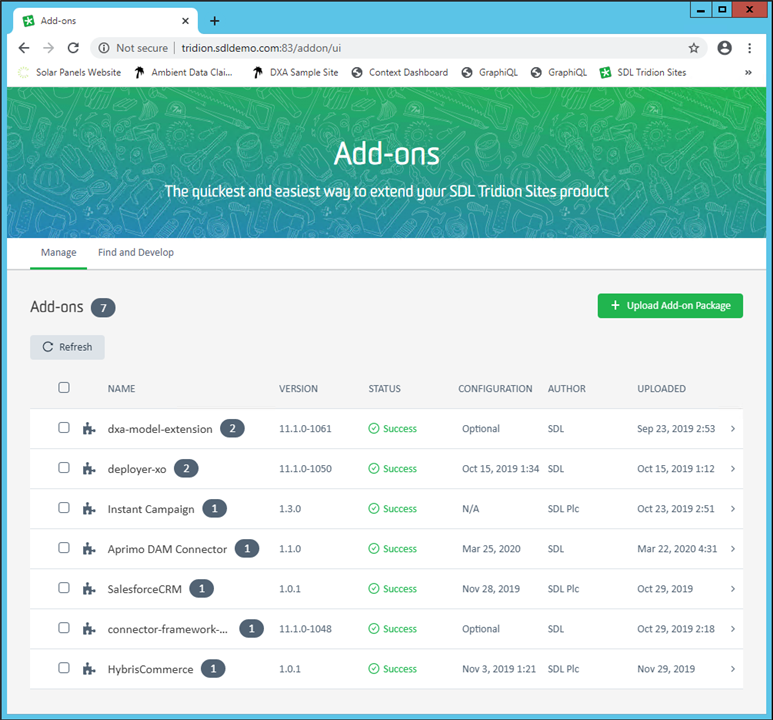
To install connectors is very easy, thanks to the new Add-on Service introduced in SDL Tridion Sites 9.1. What you need is the following:
- A ZIP file containing the connector DLLs/JARs + a manifest that described the connector (name, version, description, author etc)
- A JSON configuration that holds configuration of the connector (endpoint, credentials etc) and in which environment it should be installed (for example Content Manager, Staging DXD etc).
The ZIP file you then upload to the Add-on service. The manifest information are used to identify the connector and display information about it. After successful upload the connector is shown in the list of installed add-ons.
As the connector needs configuration before it can be used by any parts of the system, a JSON configuration file needs to be uploaded as well. The JSON configuration has the following format:
{
  "configuration": {
    "<Connector name>": {
      "configuration": {
         <Generic configuration for all environments>
      }
    }
  },
  "<Environment name, e.g. sitesCm, staging>": {
    "isEnabled": <true/false>,
    "<Connector name>": {
      "namespaces": {
        "<Connector namespace>": {
          <Environment specific configuration that overrides generic configuration>
        }
      }
    }
  },
  ...
}
Each connector can deploy one or several namespaces, where each namespace can have its own unique configuration like endpoints, different repositories etc. In ECL this maps to different mountpoints. In GraphQL you use namespaces to scope your queries.
Example configuration (taken from the SAP Commerce Cloud connector configuration):
{
  "configuration": {
    "HybrisCommerce": {
      "configuration":  {
        "pageSize": 100,
      },
  },
  "sitesCm": {
    "isEnabled": true,
    "HybrisCommerce": {
      "namespaces": {
        "hybris": {
          "displayName": "Hybris",
          "stubFolders": ["tcm:2-71-2"],
          "privilegedUserName":"Administrator",
          "configuration": {
            "url": "https://stage-hybris.company.com:9002",
            "clientId": "tridionapi",
            "clientSecret": "secret"
          }
        }
      }
    }
  },
  "dxd-staging": {
    "isEnabled": true,
    "HybrisCommerce": {
      "namespaces": {
        "hybris": {
          "configuration": {
            "url": "https://stage-hybris.company.com:9002",
            "clientId": "tridionapi",
            "clientSecret": "secret"
          }
        }
      }
    }
  },
  "dxd-live": {
    "isEnabled": false
  }
}
So each environment (Content Manager, DXD staging, DXD live etc) can have its own configuration or use a common one. In addition each namespace can have its own configuration as well, which means there can be three different levels of configurations.
More information on connector manifest files & configuration format:
https://docs.sdl.com/LiveContent/content/en-US/SDL%20Tridion%20Sites-v2/GUID-64B2DE72-6024-45D5-8727-C66C2BF841A3
https://docs.sdl.com/LiveContent/content/en-US/SDL%20Tridion%20Sites-v2/GUID-699C9AC1-76DD-4D77-B535-FCC80ED9171D
https://docs.sdl.com/LiveContent/content/en-US/SDL%20Tridion%20Sites-v2/GUID-604E96A9-2F3E-4CDC-BC0D-B6AACEC7E2B7
After the configuration has been uploaded to the Add-on Service, the connector is deployed in ECL and PCA. ECL will pickup the connector and deploy it on-the-fly, while the PCA service needs to be restarted to get the connector deployed.
Connector Templates
The next-coming sections will go through the steps to generate fully functional connector projects for .NET and Java using templates available in the NuGet/Maven public repositories. After completed the below steps you can use the connector right away, as it comes with some dummy data.
Writing .NET Connectors
There is .NET Core template available for TIF connectors. You need to have .NET Core SDK 2.2 or higher installed on your machine. To install the template on your machine you do the following:
dotnet new --install Tridion.Connector.TemplateYou can verify that it's properly installed by running only the dotnet new command. After this you are ready to create new connector projects using this template by using the following steps:
Writing Java Connectors
There is a Maven archetype available to generate a fully functional Java TIF connector. You need to have Maven 3.x and JDK installed (JDK 8 or higher).
To generate a new connector project you do as following:
-
Go to a folder where you want to generate a new Connector project.
-
From a command line, go to a folder where you want to generate the connector and run the following command:
mvn archetype:generate
-
A list of all available Maven archetypes are shown. Type ’tcf’ to filter the output. The Tridion Connector Framework archetype should show up:
Choose a number or apply filter (format: [groupId:]artifactId, case sensitive contains): : tcf

Choose archetype:

1: remote -> com.sdl.tridion.connectorframework:tcf-archetype (Archetype to create SDL Tridion connectors) -
Enter the number (’1’ in the example above) to select the connector archetype.
-
Select version. Normally you should pick the latest one in the list
-
After that you need to specify the following as input to the generation:- groupId – the group id to use in the generated Maven file, for example ‘com.company.myconnector’
- artifactId – the artifact id to use in the generated Maven file, for example ‘myconnector’- version – the version to use in the generated Maven file, for example ‘1.0.0’- package – the base package for the generated Java classes. Is by default the same as the group id- connectorName – name of the connector. Use pascal case here, for example ‘MyConnector’ -
After that you need to confirm the entered values by typing ‘Y’
-
The command generated the connector project with everything you need to build your connector. The project includes the following resources and samples:- Entity types (exposed data models)- Connector capability implementations (e.g. get data, list data, search, create new)- Test data- Icons- Add-on manifest- Connector configuration
-
Edit the manifest.json file, as needed.
-
From the command line (inside the generated project), run the following command to generate the Add-ons package.
mvn package
Note: You can also build the package from IntelliJ IDEA, Eclipse etc. -
Upload the package (as a ZIP file) to the Add-on Service. You find the ZIP file under the 'target'-folder.
-
Open the <connector name>.json configuration file that is created from the template, and edit the configuration, as needed. For the "sitesCm" part (used by ECL), set a value for
stubFolderswhere the value the URI of the folder that where the ECL stub items will be stored. You must manually create this folder, note the URI, and then specify that URI in this property.
The Java template generates configuration both for ECL and PCA. -
Upload the configuration file to the details view of deployed connector in the Add-on UI.
-
If the Connector's integration uses Public Content API, then restart the Content Service.
-
If the Connector's integration uses ECL, then refresh the Content Manager Explorer UI or just the current publication.
Using the New Connector
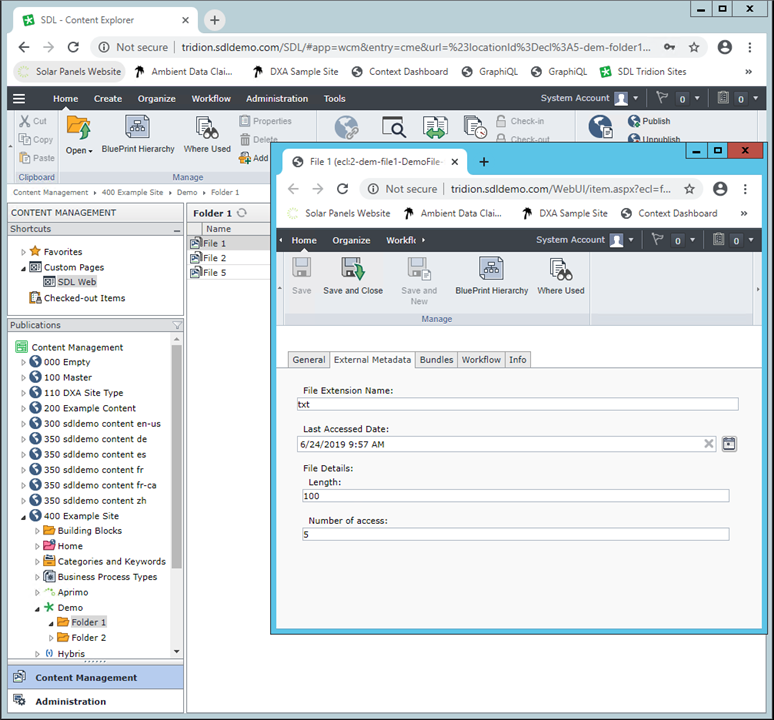
Via Tridion Content Manager you will see the new connector as a new mountpoint which you can navigate through the demo folders and view a few test items. The metadata of the test items can be updated as well.
The connector is also available via the PCA GraphQL interface. You can use the embedded GraphQL client in the PCA (if it is enabled) to run the queries, which is available on the following URL: <content service address>/cd/api/graphiql (for example http://tridion.sdldemo.com:8081/cd/api/graphiql)
Below are a few examples of GraphQL requests that interacts with the connector. To use them in your environment you might need to modify the namespace ("dem") and the type names ("DemoFile" and "DemoFolder").
Get a single item:
{
 externalItem(
   identity: {
     namespace: "dem",
     id: "file1",
     type: "DemoFile"
   }) {
    ... on DemoFile {
      title
      thumbnail
      details {
        length
        numberOfAccess
      }
    }
  }
}
Response:
{
  "data": {
    "externalItem": {
      "title": "File 1",
      "thumbnail": "http://tridion.sdldemo.com:8081/cd/api/external/binary/dem/thumbnail/DemoThumbnail.jpg",
      "details": {
        "length": 100,
        "numberOfAccess": 5
      }
    }
  }
}
List a folder:
{
  externalItems(namespace: "dem"
    filter: {
      context: {
        id: "folder1"
        type: "DemoFolder"
      }
    }) {
    edges {
      node {
        ... on DemoFile {
          identity {
            namespace
            id
            type
          }
          title
        }
      }
    }
  }
}
Response:
{
  "data": {
    "externalItems": {
      "edges": [
      {
        "node": {
          "identity": {
            "namespace": "dem",
            "id": "file1",
            "type": "DemoFile"
          },
          "title": "File 1"
        }
      },
      {
        "node": {
          "identity": {
            "namespace": "dem",
            "id": "file2",
            "type": "DemoFile"
          },
          "title": "File 2"
        }
      },
      {
        "node": {
          "identity": {
            "namespace": "dem",
            "id": "file5",
            "type": "DemoFile"
          },
          "title": "File 5"
        }
      }
    ]
   }
 }
}
For more information about the connector GraphQL requests, see:
https://docs.sdl.com/LiveContent/content/en-US/SDL%20Tridion%20Sites-v2/GUID-C1540E2B-9C9A-4071-B4AD-3B490FBBD9B6
https://docs.sdl.com/LiveContent/content/en-US/SDL%20Tridion%20Sites-v2/GUID-8A849DCF-70AB-469F-8D8C-9DBE009FB304
Summary
Using the different templates for C# and Java can kickstart your development of new Tridion connectors. In addition the add-on service makes it easy to centrally configure and deploy your connectors to various parts of your Tridion system. In the next blog post I will describe more in details the concepts of the Tridion Integration Framework and go through an example connector.
In meantime here are a few additional resources:
- Implementing Connectors: https://docs.sdl.com/LiveContent/content/en-US/SDL%20Tridion%20Sites-v2/GUID-20EB960E-25E8-4B5B-99F5-9136039B907A
- Video recording from a TDS talk on the Tridion Integration Framework: https://vimeo.com/374369509
-

Rahul Kumar Singh
-
Cancel
-
Vote Up
0
Vote Down
-
-
Sign in to reply
-
More
-
Cancel
Comment-

Rahul Kumar Singh
-
Cancel
-
Vote Up
0
Vote Down
-
-
Sign in to reply
-
More
-
Cancel
Children