The DXA Module
The module is available on Github here: https://github.com/NiclasCedermalm/dxa-alpaca-forms
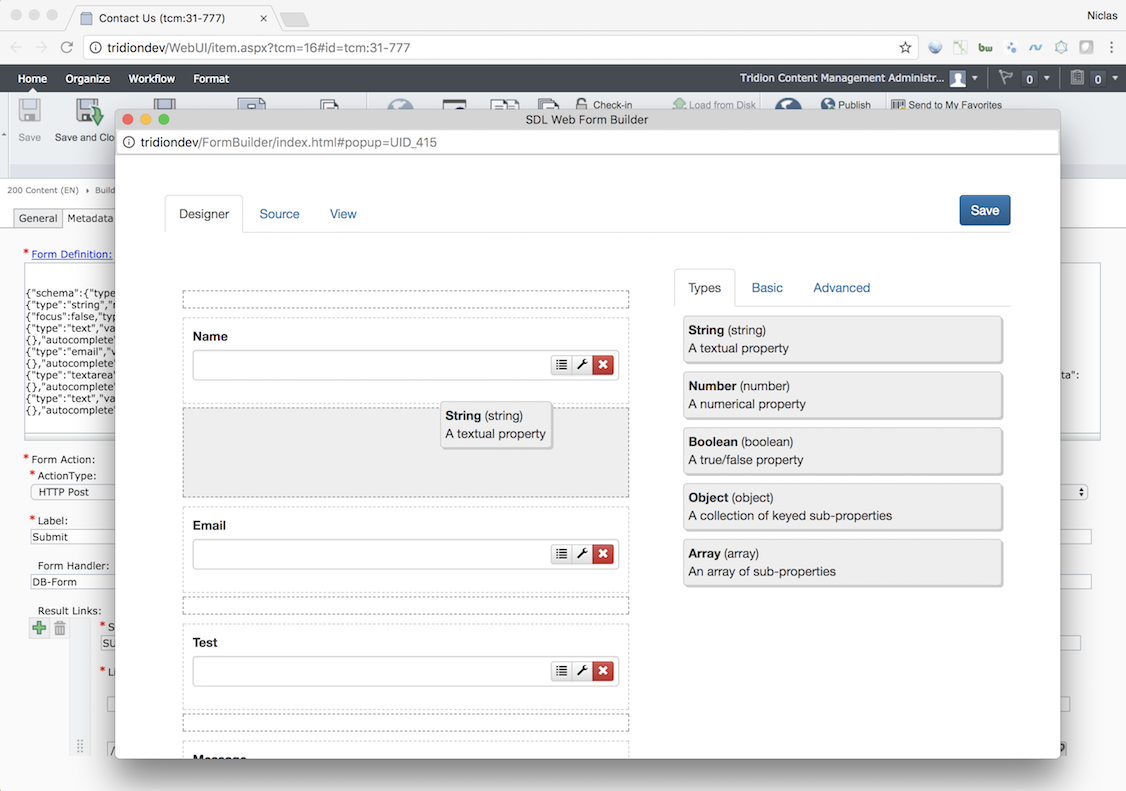
Through the provided form designer extension, forms can be created directly inline from the SDL Web CMS GUI. The forms are managed as standard SDL Web CMS components and can be added to arbitrary DXA pages. The forms can easily be skinned using the DXA HTML design mechanism.
The forms can submit data to a configurable end-point, such as a RESTful web service. The Forms DXA module also comes with a built-in controller that can dispatch form data to various handlers that can process the data, such as store it into a database, send as an e-mail, pass data to a CRM etc. A handler to write form data into a SQL based database is included in the module.
The Forms DXA module also supports prevention of CSRF (Cross-Site Request Forgery) attacks.
The module comes with the following:
- DXA schemas and templates
- Integrated Forms designer in CME/XPM, which is a modified version of the Alpaca.JS forms designer
- DXA HTML design add-on with needed Alpaca CSS and Javascripts
- DXA module for Java and .NET with JSP/Razor views and form controllers
- Pluggable form handler architecture
- Form handler for writing form data in a SQL database
Here is a short video showing how to create a Alpaca form using XPM:
How to works
The forms designer is installed as an IIS application on the SDL Tridion server. The Alpaca.JS form designer has been modified so it fits SDL Tridion plus some other additions to improve the usability. The designer is invoked as a custom URL extension (the absolute simplest way of doing GUI extensions [:)]). The custom URL is set in a metadata field in the form schema. This field stores the actual JSON schema of the form. When saving the form definition in the form designer will trigger an update on this metadata field (the beauty of the simplicity of the custom URL concept). The form designer itself is totally agnostic to what site solution you are using, so you can also use it with DD4T, classic Tridion templating etc.
Below show the Tridion schema for Alpaca forms:
Example of the form designer invoked from a form component:
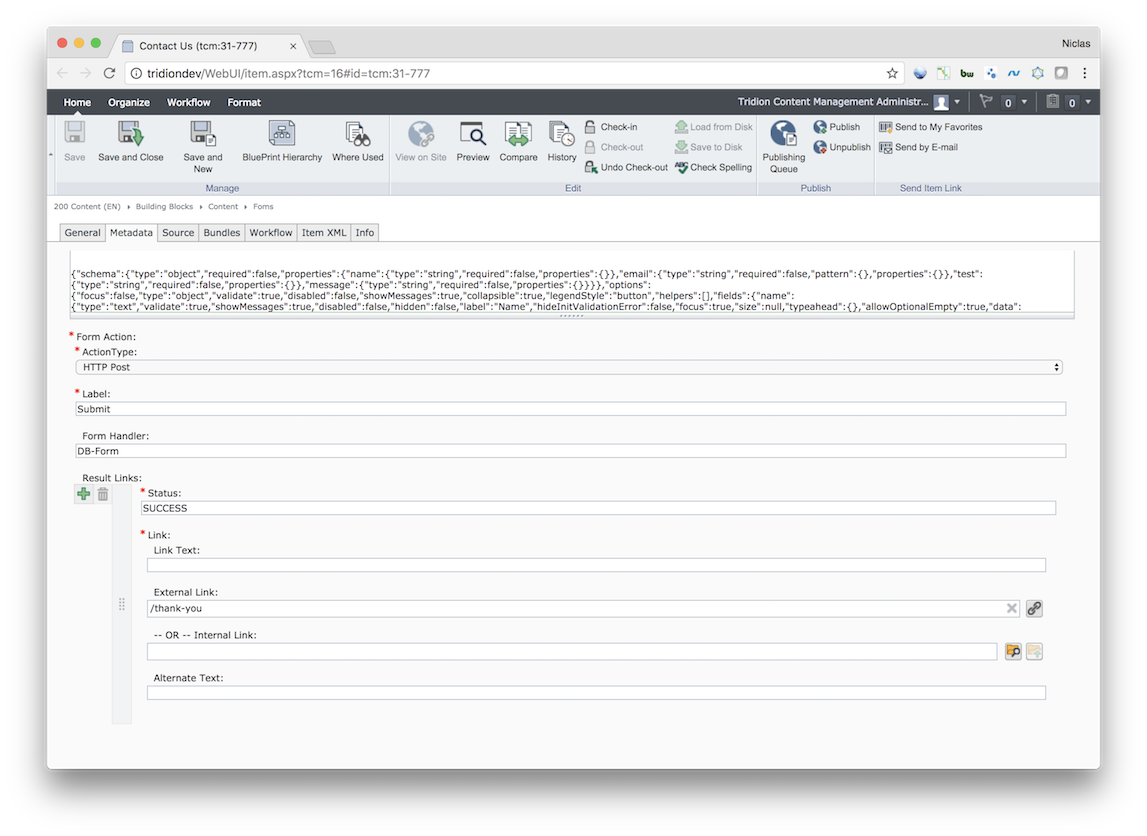
On a form you can either pass the control to a form handler (managed by a forms controller in the DXA module) or post the result to any URL (for example an web service). Below is the available metadata that can be set on a form component:
- Form definition (Alpaca.JS JSON schema)
- Form action - HTTP Post or AJAX HTTP Post
- Form label, e.g. "Submit"
- Form handler to invoke, e.g. "DB-Form"
- Result links - A list of links (embedded schema) that defined what result page the form controller should redirect to depending if the form action was successful or not
- Target - point to any URL. Is an alternative to form handlers where you can use an arbitrary URL to post the form data
- Action Javascript - javascript code to be executed when submitting a form. This could be used to do some additional validation or processing of the form data.
- Readonly fields - a list of predefined hidden fields that are always included in the form submission. This could for example be customer segments, lead source etc.
Example of a form component:
When render published form components it will aggregate the JSON schema with the above settings such as submit labels, javascript action code etc. The aggregated JSON schema is outputted as a Javascript snippet and the rest of the magic is handled by the Alpaca.JS scripts which is provided by the DXA HTML design additions included by this module. Example of DXA.NET Razor code to render Alpaca forms:
@model Form<div @Html.DxaEntityMarkup()> @if (!string.IsNullOrEmpty(Model.Title)) { <h3 @Html.DxaPropertyMarkup(Model, "Title")}>@Model.Title</h3> } @{ var formId = Model.Id.Replace("-", "_"); } <script> var alpaca_form_@(formId) = @Html.Raw(Model.AggregatedDefinition); </script> @if (!WebRequestContext.IsPreview) { <div id="csrf-@formId"> @Html.AntiForgeryToken() </div> } @* Placeholder to where Alpaca will generate the form into *@ <div class="alpaca-form" id="@formId"> </div></div>
Getting Started
To install the Alpaca form designer and the DXA module (which is available in Java and .NET flavours), you can follow the instructions given here: https://github.com/NiclasCedermalm/dxa-alpaca-forms
In above link you also are given instructions on how to setup the database form handler. The form handler also comes with some simple administration pages where you can view the submitted forms (can be handy during development and in demos).
If you want to create your own form handler you can follow the simple steps below:
DXA.Java:
- Implement the interface FormHandler
- Make sure you use the Spring @Component annotation. Then the form handler registry will automatically pick it up at initialization of your Spring context.
Example of Java implementation: DatabaseFormHandler
DXA.NET:
- Implement the interface IFormHandler.
- Register it to the FormHandlerRegistry. This can for example be done in your area registration.
Example of .NET implementation: DatabaseFormHandler
An simple C# example is given below:
public class ExampleFormHandler : IFormHandler{ public string Name { get { return "Example";} }
   public string ProcessForm(Form form, FormCollection formData)
   {
       // Consume the form data and form definition.
       // For example saving it in a DB or invoke a web service
       // Return configured success link as result page
       //
       return form.FormAction.GetResultLink("SUCCESS");
   }
}
The name you return in the form handler's getName() method respective Name property is what you configure in the field 'Form Handler' in the form component. Then the form controller knows what handler to use for that particular form component.

 Translate


