Welcome to another post of the Digital Experience Accelerator (DXA) marathon, meant to explain how DXA works, what are the different ways to use it and how can you contribute to it.
Yesterday’s post talked about how to create modules in order to have a more flexible and more transparent work environment.
Today we will move away from our Visual Studio project and have a look at the Content Manager (CM) configuration. DXA has a predefined structure modules registration that is easy to learn and provides consistency. The structure of these modules is mirroring the authorization model and consists of Admin, Developer, Editor and Site Editor.
In this blog post I will take you through the steps of creating your modules in the CM and additional features that come with DXA. We’ll touch the mandatory components and how to apply the existing authorization model.
As a starting point, we assume you have installed the default “linear” BluePrint functionality. If you have not installed the BluePrint, information on how to do it can be found on http://docs.sdl.com/LiveContent/content/en-US/SDL%20DXA-v2/GUID-EDB49D8A-DCC3-45E7-B809-6A8B377C4FEA.
When this BluePrint will not be practical enough for the ambitions of the customer I recommend you to read and apply the information from the following article. It’s a must read about the possibilities to extend/modify the “linear” BluePrint (http://www.tridiondeveloper.com/tridion-dxa-blueprinting-options).
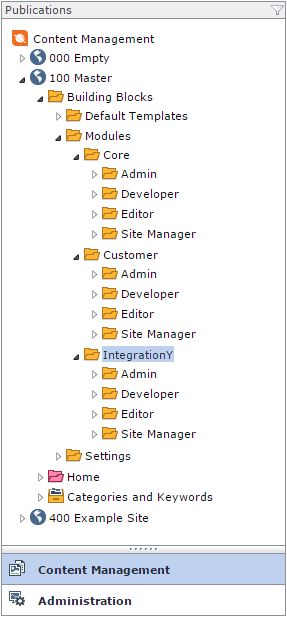
First step is to create the folder structure in the Content Manager. Open the Content Manager and browse to the publication “100 Master > Building Blocks > Modules”. By default, the core module is installed and shows the structure that we will recreate in our modules. Create the folder(s) for your custom modules; in my case I’m using “Customer” as folder name for Site and “IntegrationY” for my Module
As mentioned earlier in the article, this structure is used to extend the usage of the authorization model in DXA. The authorization model has the following predefined roles:
Admin - Content Manger Administrator:
In all Publications, have all the permissions.
Developer - Template and/or Module developer:
In 000 Empty Master, 100 Master, and 400 Example Site Publications has the following permissions:
- Folder Management
- Component Template Management
- Page Template Management
- Template Building Block Management
- Virtual Folder Management
Editor - Content Author:
In 100 Master and 400 Example Site Publications has the following permissions:
- Folder Management
- Component Management
- Page Management
- Publish to Content Distributor
- Virtual Folder Management
Site Manager - Management of Structure and Site:
In 100 Master and 400 Example Site Publications has the following permissions:
- Folder Management
- Structure Group Management
- Component Management
- Page Management
- Publish to Content Distributor
- Workflow Management
- Category Management
- Virtual Folder Management
- Bundle Management
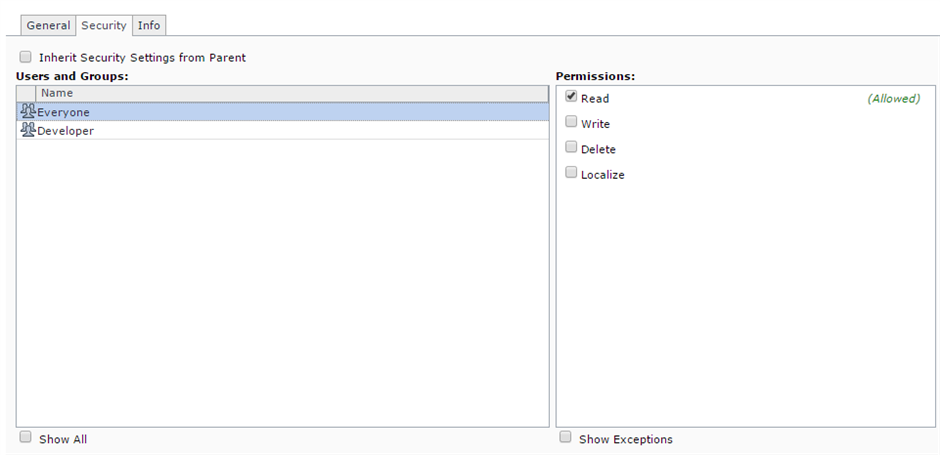
As you can see these matches with the folders we have created for each module. The next step is to apply these roles on our module’s sub-folders; select the "folder > Properties" and select the "Security" tab.
Unselect the checkbox “Inherit Security Settings from Parent”.
These are the permissions as they are predefined within DXA:
Admin folder:
|
Everyone |
Read |
|
Developer |
Read, Write, Delete, Localize |
Developer folder:
|
Everyone |
Read |
|
Developer |
Read, Write, Delete, Localize |
Editor folder:
|
Everyone |
Read |
|
Developer |
Read, Write, Delete, Localize |
|
Editor |
Read, Write, Delete, Localize |
|
Site Manager |
Read, Write, Delete, Localize |
Site Manager folder:
|
Everyone |
Read |
|
Developer |
Read, Write, Delete, Localize |
|
Site Manager |
Read, Write, Delete, Localize |
The Developer, Editor and Site Manager folder can contain the following sub-folders:
- Schemas
- Templates
- {ModuleName} Template Building Blocks
Add the name of the Module in the sub-folder to keep consistency and clarity for in the Template Builder
The sub-folders should inherit the security settings from the parent, make sure that the checkbox “Inherit Security Settings from Parent” is checked.
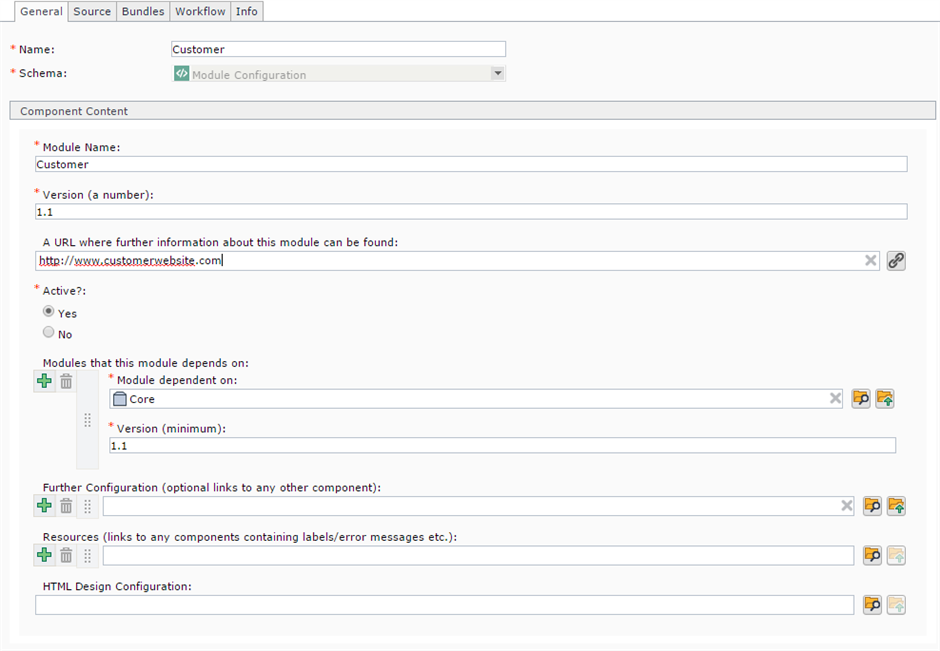
Our last step is to create the mandatory Module Configuration Component that is being used to link to the DXA Core. The Schema comes with the installation of the DXA Core and doesn’t have to be created in advance. Below is an example of a Module Configuration Component, filled in for my “Customer” module.
Most of the fields in the schema are self explanatory and easy to use. The use-case for “Further Configuration” and Resources” is one of the features I really like.
Further Configuration, Resources
When creating your module you might have settings and/or fields that you want to be translatable and not hard-coded. This will allow a Site Manager to change the settings in less time and without the involvement of a developer.
Example of a setting value could be a display for a maximum of 4 items. This settings we can take from the code and put in the CM, if then needed the Site Manager can change the amount from 4 to 8 items.
Or,if you have a label in your view, saying “Good afternoon madam, …”, we can move this value in the CM, if needed the Site Manager can change the value to “Buenas tardes señora, …” by using the Resources Fields.
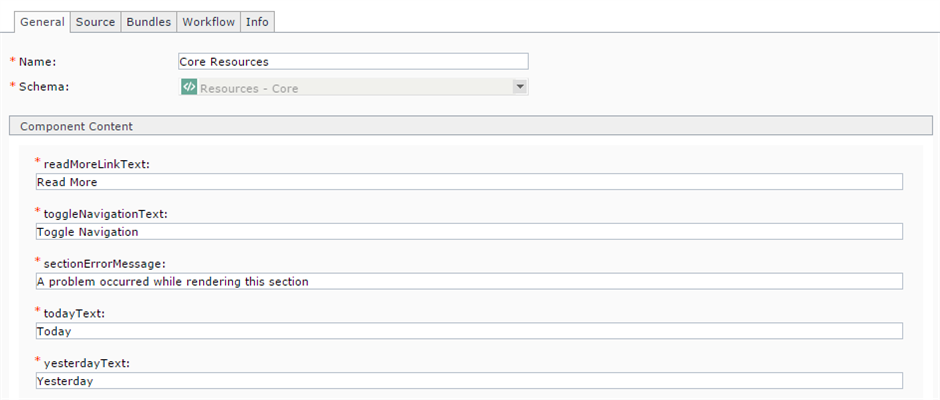
These Key-Value pairs will be created outside the Module folder, namely in the Settings folder. The first step in this would be to create the Schema. Where the XML name becomes the Key and the textfield will be the Value, as example you can look at the “Core Resources” shown below.
It's not recommended to re-use the values from modules that are not your own, there is always the change in the next release of the module that the fields don’t exist anymore.
Don’t forget to set-up the correct rights, so that the Site Manager can change/translate settings for the module. The changes will be available when you republish the “Publish Settings” page in Home > _System of the desired website, “400 Example Site”.
Settings/Module folder:
|
Everyone |
Read |
|
Developer |
Read, Write, Delete, Localize |
|
Site Manager |
Read, Write, Delete, Localize |
Okay, at the end, just an one liner of Visual Studio code to showcase the easy use of these settings.
string value = localization.GetConfigValue("customer.carouselMaximum")
Thank you, and hope to see you tomorrow for another DXA post [:$]

 Translate


