

Video tutorial
Quick start
This topic contains condensed instructions to get you to quickly start working with SDL SDL Trados Business Manager.
First of all, when you run SDL Trados Business Manager for the first time (clean installation), you will be prompted to enter a password. By default, user name is Admin, and password is User@TBM. After logging in, you can select Security > Users (or click User icon on the top toolbar and select Manage user), then open Admin user and change its password (and even set to blank, so logon window won't appear when you launch TBM).
The more settings and reference data you enter to begin with, the better. But it is hard to fill in this type of baseline information in any program until you get a feel for the program itself. Here are the minimum fields that must be completed before you create your first job.
Configure application settings
First of all, open application settings and go through all tabs and regions. There are a lot of settings which you can configure, and their description is provided in the Application settings article. However, main settings which is recommended to check before starting are:
- Main data and contact details. This tab contains just basic information about your entity, and mainly are used in generated invoices and other documents.
- Integrations. Here you can connect to GroupShare, Language Cloud, cloud drives (if you want to be able to download/upload files from/to cloud)
- Application settings, page1:
- Base currency, Earning accounting type, Earning accounting method. It's preferred to select these values and don't change it after adding first documents.
- Default work type, language pair, fuzzy scheme - yuo can fill these values just for convenience, so these values will become default when you create new documents like translation jobs.
- Numbering settings. Also recommended to fill before usage of the application, as these settings affect on numeration of all created documents. You can still change it later and apply changes to existing documents.
- Application settings, page 2 > Audit trail. Audit trail registers all changes in selected entities. From one side, it is useful to be able to check entity history. From the other hand, it leads to creation of additional information in a database and slightly increases CPU load, so it's recommended to enable this functionality only if it's needed.\
- Files and folders. Also it's a place where parameters should be specified before starting to use the application. Here you specify folders where files will be stored, as well as patterns applied to folder names.
- Invoice settings > Default tax. Select this value if you always apply some tax in all your invoices.
- Job settings > Default unit. This unit will be used by default in all tasks created in jobs. Sometimes it is convenient to select 'Words' here.
- Assignment settings > Notifications. If you use Online version, please enable notifications which you wish to automatically send to vendors in certain scenarios.
- Assignment settings > Recommendation options. Disabling some recommendation mechanism could increase application performance.
- Scheduler settings. Here you can enable built-in scheduler and link it with cloud calendar (Google or Microsoft). Usually this functionality is used by freelance translators, but not teams.
- Vendor portal. Here you can enable self-registration for vendors on a vendor portal.
- Mail sender settings > Auto-upload to cloud drives. These options allow to send large files using built-in mail sender by automatic uploading these files to a selected cloud drive and inserting a link to this file in a mail message.
Set up reference data
After setting application parameters, it is recommended to go through all reference data tables and add necessary data where needed.
You can use Excel export/import functionality to fill reference data tables faster.
- Go to Reference data > Languages and check if all the languages that you will work with are in the list. By default, TBM creates a list of common languages. However, you're free to delete any languages and create custom ones.
- Go to Reference data > Language pairs and create necessary language pairs. You can use the drop-down to select source and target languages created on a previous step or Plus icon to create new language on fly.
- If you need to add to the default currencies (USD, GBP and EUR), go to Reference data > Currencies and create necessary currencies by clicking New button.
- Go to Reference data > Taxes and add one or more taxes with their percentages.
- Go to Reference data > Payment methods and create payment methods which you will accept when invoicing your customers.
- Go to Reference data > Fuzzy schemes and create as many fuzzy schemes with correct fuzzy factors as you use in your work.
- Go to Reference data > Message templates and edit default message templates which will be used when application generates internal notifications and mail messages in different events (for example, when customer creates a new quote request via portal, or vendor delivers a job, or you send an invoice to a customer, etc.).
- Go to Reference data > E-mail accounts and create default (and non-default if needed) e-mail accounts used to send messages and notifications using built-in mail sender.
- Go to Reference data > Service types, Units, Specializations and create services, units and domains which relate to your company.
- Go to Reference data > Clients and create your clients. For each client, you may provide a lot of settings (including default taxes, invoicing rules, default invoice templates, etc.). However, main goal at start is to provide customer name, customer contacts and price-lists.
- Go to Reference data > Vendors and create your vendors, if applicable. For each vendor, you may provide a lot of settings, but main goal at start is to provide list of provided services, languages, domains and price-lists.
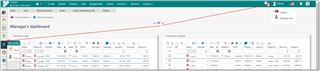
Of course, it is not mandatory to create all reference data in advance, because any reference data can be created on fly, when it's needed. However, while you start to use application and may be not familiar with its UI, it's better to create some data in advance, which allow not to distract on reference data creation when filling documents. For example, have a look at a translation job creation screen:
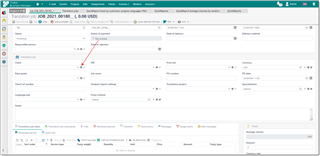
If you don't have necessary customer in the database, you can click Plus icon to create a new one. Job form will be greyed out, and a popup dialog will appear:
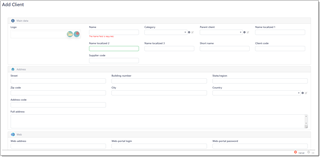
Here, you fill new customer's data, click OK, and it will be automatically selected in the Client field.
Create a quote
This step is optional, and you can directly move to a translation project creation. However, when you have a quote, project can be created using a single click.
- Hit Alt-2, or select quotes in a quick access toolbar, or select Workspace > Quotes in the navigation menu.
- Click New to start creating a new quote.
- Fill necessary fields, select a client, source and target languages. It is preferable that a selected client has some default price-lists, so pricing information will be filled automatically in next steps.
-
To fill quote items, you have a few options:
- Click Import from CAT tools button on the toolbar. In the modal dialog, you can upload an analysis file generated by one of supported CAT tools.
-
Click SDL button and import a GroupShare or Trados Studio project.
-
Add quote items manually. In this case, click New button above the table and fill task information:

Here, when you select service type, language pair, fuzzy type and unit, price will be determined automatically based on a client's price-list and selected fuzzy scheme.
- When quote is ready, save it by clicking Save.
-
Click Print button on the toolbar. You will see print preview dialog:

Click Export to button to save generated document in one of supported formats. - Close print preview dialog and switch to the Files tab.
- Drag and drop generated document to the drag and drop area, or
- Click Generate PDFs button on the toolbar to generate PDF without previewing it
- Click Write a message to PM button to create a message, select attached files, and change message text as necessary.
- Click Send to send message, or OK to just save it without sending.
-
When you receive a confirmation from a client, either in quote list or quote detail view, click Accept quote button. A new translation project will be created, along with translation jobs. The number of created translation jobs will correspond to a number of language pairs specified in a quote.

-
Source files will be automatically moved to a created project.
Create translation project, jobs and assignments
Translation project is a "box" for translation jobs. While translation project could have a single source language and multiple target languages, translation job always have a single language pair and possibly multiple tasks. Each task describes amount of work which should be done (for example, translation of 1000 words, or 3 hours of interpreting). Translation job describes amount of work which our company is going to do for our client (or ourselves, if our company is a content creator). For each task (or all tasks) in a translation job a translation assignment can be created, which could be assigned to some vendor (freelancer translator or LSP).
Translation projects allow to handle this by controlling a set of translation jobs and their assignments on a single screen. You can create translation project from a quote, manually by creating a new project or by cloning some previous project.
Here is an example of a procedure:
- Go to Workspace > Translation projects and click New.
- Fill necessary data, like a client, specialization, project name, deadline, source and target languages.
- Optionally, go to the Files tab and upload source files.
- Switch to the Jobs tab and click Create jobs button on the toolbar. This will create empty jobs for each language pair specified in a project. You can also create jobs one by one by clicking New button.
- Fill tasks in created jobs by:
- Opening each job and adding tasks manually;
- Selecting each job and importing data from analysis file or SDL sources (GroupShare or Trados Studio);
- Switching to the Job tasks tab which displays all tasks of all project jobs and clicking Add a new service to all jobs or Add a new service to the selected job buttons to quickly add similar tasks to all jobs.
- Create assignments:
- Select a job and click Create assignment button.
- Select either One assignment for all unassigned tasks or Separate assignment per each job task.
- Select files which you wish to attach to an assignment (and possibly send to a vendor).
- In a created assignment, select a vendor and provide other details.
- Optionally, click Create POs button to generate purchase order and attach it to a created assignment.
- Click Create message to vendors button to send a message to a vendor. If we use vendor portal, then changing of assignment status from Prepare to In work will initiate automatic notification to a vendor.
- When you receive processed files back, attach them to an assignment. If vendor portal is used, vendors could deliver files online.
- When all files are delivered, click Write message to PM button. You will see file selector, where you can select which files to attach. Here you can view all files from project assignments and jobs, so it's possible to select all deliverables. Optionally, you can download all delivered files to your computer, pack them into archive and upload them to a project to make it possible to deliver single file to a client.
- Send a message with files and mark a project as completed by changing its status.
- Optionally, click Print in the project view to generate Project overview document which displays all jobs, assignments and results.
Invoicing
After delivering some jobs/projects, you can create invoices over them. There are few options to do that.
- Go to the project list, select project and click Create invoice button. The system will create an invoice by including all delivered and uninvoiced jobs into an invoice.
- Go to the job list, select any number of jobs and click Create invoice.
- Via dashboard:
- Open client settings, switch to the Settings tab and find Invoicing threshold parameter. Set some value there:

- Go to the Dashboard and find Ready to invoice widget:

This widget displays amount of all delivered jobs for your clients where amount of these jobs exceeds invoicing threshold set for each client. - Click Create to create an invoice.
- Open client settings, switch to the Settings tab and find Invoicing threshold parameter. Set some value there:
- In the invoice view, click Print to view an invoice with possibility to export it to PDF, or click Generate PDFs to create PDF file and attach it to an invoice.
- Click Message to client(s) to send an invoice to a client using built-in mail sender.
- When payment arrives, open invoice list and click Create a payment, to mark an invoice as paid and add payment to a client's balance.
In the invoice list, you can quickly find unpaid invoices using filters. Overdue invoices are marked with special icon in the Payment term column.
Reports
Basic information about your current state and performance can be found on the Dashboard. Default dashboard provides information about ongoing jobs, unpaid invoices, as well as charts displaying total earnings and turnaround. So, dashboard could provide overview of a current state. If to add possibility to customize dashboard by adding custom views with custom filters, you can configure it to display almost any data contained in the database.
However, for more extensive insights you can view reports. Most interesting part here is QuickReports. They provide dashboard-style reports with quick filters and different ways of representing data, including simple and pivot tables, charts, scatter charts, cards, gauges, and even geo maps. Here is an example of such report:
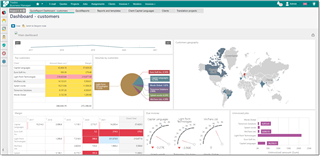
There are plenty of built-in reports, and you can use them as a basis to create custom reports.
Conclusion
This article described only very basic description of the workflow used in TBM. Of course, it could be more complex and customized. For example, quote could be created by a client using a portal, application could send notifications to users upon different events (quote submitted, quote ready, job offer arrived, etc.), you can manage tasks and receivables in jobs separately, you can simplify project creation by importing data from existing GroupShare projects, or you can send files directly to Studio to generate project and analysis and immediately import it back to a project, you can pickup vendors based on vendor groups and machine learning system, you can send job offers to different vendors and compare them on a single screen to select the most suitable one, you can register incoming invoices, create credit notes, etc. Additionally, customization possibilities allow to create custom views for different users, custom filters, and security system allows to create limited access areas with granular control up to individual fields, allowing you to separate data between users depending on their rights and responsibilities. Printing templates (quotes, invoices, etc.) also can be customized using extensive visual designer allowing to control absolutely every part of a generated document, and localized up to 4 different languages.
This user's manual contains detailed information about each aspect of the system. Where possible, articles contain (or will contain) short videos demonstrating described functionality. We recommend you to carefully read the documentation, use search to find answers on your question, and don't hesitate to reach us on forums with your suggestions, questions and comments.