Viewing translation jobs
To view list of jobs:
- Open the Dashboard and find Ongoing jobs widget;
- Select Workspace > Translation jobs item in the navigation menu.
- Click Translation jobs at the top toolbar.
Creating new translation jobs
As opposed to projects, translation job is created per one language pair. While creating a job, you may also select a project which this job belongs to.
To create a new translation job:
- Click Create new job... button in the quick access toolbar;
- Click New button in the job list.
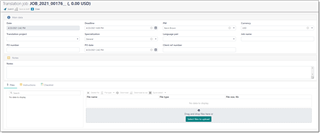
Job creation form will be opened:

Here you can specify deadline, project manager, specialization, language pair, PO number, name of the job and internal job number. Optionally, you can provide additional instructions on the Instructions tab.
On the Checklist tab, you can provide required items to be checked before the job delivery.
To upload files, drag and drop them to the File manager. After uploading file, use File type button to specify correct types for uploaded files (Translatable is selected by default).
Click Save to save a request and send a notification to a manager, who will process attached files, create necessary tasks for a job and calculate job amount. If you're not ready to submit a job, click Save as draft, to be able to return to it later (can be found in the job list).
For messaging between customer and a manager, Messages tab can be used, as in quotes and projects.
Making edits in translation jobs
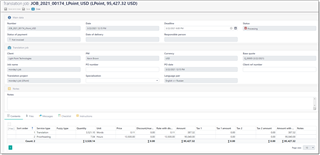
If you saved a job and wish to edit some information, you can do this, but only empty fields will be available for editing. To edit a job, find in on the dashboard or in the job list, and click on it. In this mode, as opposed to job creation mode, extended editing form will be opened:

It has a little different layout, with more fields and Totals group at the bottom.
As you can see, some fields are available for editing - you can put any information there and save changes. If you wish to edit information in a disabled field, please send a request to a manager using Messages tab.
Additionally, using the file manager you can upload additional files by clicking Upload additional files button in the Files tab.

 Translate