Overview
SDL Trados Business Manager allows to attach files to the following entities:
- Clients
- Vendors
- Quotes
- Translation projects
- Translation jobs
- Translation assignments
- Invoices outgoing
- Invoices incoming
- Mail messages
Folder creation
First of all, you have to configure base folders where you're going to store your files. To do this, open application settings and switch to the Files and folders tab:

Detailed description of this page is provide in the Application settings article.
General idea is that you have some base folder for your files (Default folder with work files), which contains subfolder for entity type (jobs, quotes, etc.), and another subfolder for files of a certain entity. If base folder is mandatory to be specified, then folders for entity types can be empty. For example, if base folder is C:\Files, and Folder for storing quote files is blank, then a folder for any of your quotes will be created right inside C:\Files folder. Of course, folder template for quotes may include subfolders as well. For example, Quote folder template may look like this: Quotes\Quote {0}.
For some entity types, you can't specify folder name template. The following table summarizes how TBM determines folder name for each entity type:
| Entity type | Folder name detection method |
| Translation project | Project folder name template parameter specified in the application settings |
| Translation job | Job folder name template parameter specified in the application settings |
| Translation assignment | Assignment folder name template parameter specified in the application settings |
| Quote | Quote folder name template parameter specified in the application settings |
| Invoice incoming | [Year]\[Month and day] [Invoice number] [Vendor name] |
| Invoice outgoing | [Year]\[Month and day] [Invoice number] [Customer name] |
| Customer | [Customer name] |
| Vendor | [Vendor full name] [Vendor creation date] |
| Mail message | [Year]\[Date] [Subject (first 15 symbols)] |
As you see, first 4 folder templates are customizable, while others are not.
When you create or edit entity which supports file attachments, you will find Files tab in the entity editing window. For example, here are screenshots of the client editing form and quote editing form:


As you see, look of file manager is identical on these images. In the upper field you will find folder name determined based on the application settings and values of a current entity. Since folder name could depends on values provided in form fields (like quote date, project name, currency, project number, etc.), value provided in in the Folder field will change each time you make changes in the corresponding fields.
For, example, you can see that TBM creates a folder named Customers\Capital languages for a client named Capital Languages. For jobs, for example, you can use customer name, job date, currency name and other values to build a folder name.
By default. when TBM determines folder name, it is NOT automatically created on a hard drive. There are few reasons behind this:
- Some value could be changed for an entity which will affect folder name. In the example above, if you change customer name, folder name will also be changed, but only if it doesn't actually exists on a hard drive;
- It could be a case that you will not add any files to an entity, so there is no sense to create just an empty folder.
When a folder does not exist yet on the hard drive, corresponding icon is displayed near folder name:

To physically create a folder on a hard drive, do one of the following:
- Click Create folder green button before folder name. This button is visible only if a folder does not exists on a hard drive:

- Upload any file by dropping it to the drop area or by clicking Select files to upload button. If a folder does not exist. it will be automatically created, and your file will be copied to the source folder inside entity folder..
You can always view your files on a hard drive by navigating to a base TBM folder using any file explorer. If you're using Desktop version of TBM, you will see a button to quickly open current folder in the File Explorer:

Default folders
When TBM creates a folder for your entity, it creates the following folders inside it by default:
- source
- ref
- out
Names of these default folders can't be changed, as application behavior depends on contents of these folders.
All source files which should be processed and returned are placed inside source folder. When you create job or assignments, you will be able to attach files from the source folder to created entities.
Reference and other files are placed into ref folder. Files from this folder are automatically propagated into nested entities. For example, if you put any file into ref folder of some client, then this file will be automatically added into ref folder of all projects, jobs and assignments belonging to that client. In the same manner, files can be added to ref folder of some translation project (propagated to nested jobs and assignments) or translation job (propagated to nested assignments).
Out (target, or delivered) files are put into out folder automatically when a vendor delivers a file via vendor portal or when click Upload target file in a job or assignment. When target file is uploaded, application creates folder with target language name inside out folder, and then puts target file into corresponding nested folder, according to hierarchy of a source file in the source folder.
Working with folders
When folder is created, you can start viewing its contents and upload files. In addition to main folder for an entity, you're able to create nested folders. Tree on the left will display folder structure, allowing to navigate between folders. When you upload a file by dropping it into the uploading area, then a file will be uploaded to a currently selected folder.
Above the folder tree, the following commands are available:
 Create folder. Creates a new folder inside currently selected folder.
 Delete folder. Delete currently selected folder with all files. Linked files won't be deleted.
 Unlink folder. Removes all linked filed from a currently selected folder and all nested folder.
 Rename folder.
 Download folder as zip. Packs all files from a selected folder (with all nested folders, including linked files), and downloads them in a single zip archive.
Direct and linked files
File manager of an entity may display 2 types of files: direct files uploaded to the folder determined by an entity, and linked files which were added from other entities as links. Such linked files are physically stored in folders of their master entities. Linked files look as regular files in the file manager, and they can combine with direct files in the same folder. You can download direct and linked files, but you can't delete/rename/move linked files - these operations are available only for direct files.
Translation job has a source file stored in the source/folder1 folder. You create translation assignment from this job and include job file in a created assignment. This file will then be displayed in the source/folder1 of a created assignment, i.e. in the same relative folder. At this stage, no physical folder is created for an assignment, because it does not contain any direct files. Later, you upload additional file to the same source/folder1 folder. In the result, a folder is created for an assignment on your hard drive, and uploaded file is copied to the source/folder1 folder. This folder physically contains only one file, but in file manager TBM displays 2 files: one direct and one linked. However, you can select both files and download them, or upload target files for any of these 2 files.
Uploading files
When folder name is determined, you can click Create folder button in the Entity folder group, or simply start uploading files using drop area below list of files:

There are 3 ways to upload files:
- Drag and drop files to the drop area;
- Click Select files to upload button, to open a dialog where you can select files;
- Click Upload and extract zip file - this button is useful when you have to upload many filed with nested folder structure; you may pack such structure into a zip file and then upload it - TBM will extract a file keeping your folder structure.
File operations
File manager provides the following commands on the toolbar:
- Delete a file from TBM and from hard drive by clicking Delete file button.
- Select file type for a selected file(s) by clicking File type button and selecting target file type.
- Move file to another folder existing in a current entity by clicking ... button near file name, selecting Move to another folder and selecting folder name:

- Rename a file by using same context menu and selecting Rename file option.
- Upload new version for a file by using same context menu (see below).
- From translation jobs and translation assignments, add a file from a source project or job by clicking Add file from base project/job (
 )
)
Cloud drives
In addition to local files, you can add links to files store in cloud drives (OneDrive, Dropbox, Google Drive). Cloud files are not downloaded by default, TBM only stores a link to a file, which can be used when needed.
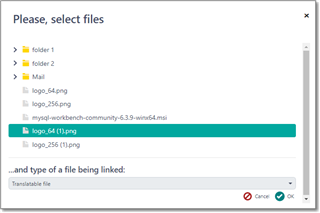
To add a link to a cloud drive, click Add Dropbox file, Add Google Drive file or Add OneDrive file button on the toolbar. To be able to use these buttons, you have to establish connection with a cloud drive from the Application settings > Integrations tab. In the result, you will see a dialog with a tree displaying your files from a selected cloud drive:

Here you can expand folder and select files to add to an entity. Before clicking OK, please select file type in a corresponding field.
When a cloud file is added to an entity, you can use it to send to your clients or vendors, or pass to your colleagues. Users who has access to an entity will be able to download cloud file by clicking Download button. If you create a mail message and attach cloud file there, then this file will be downloaded and attached to a message (if file size allows to do that).
Downloading files
To download a file or files, select them in the list and click Download (available only for single file) or Download as zip (available when a single or multiple files are selected). For large files, it is recommended to use zipping functionality.
If selected files include cloud files, then TBM will download them and then allow you to save on your local hard drive. Depending on a file size, downloading a file from a cloud to a TBM server may take some time.
Linking files from master entities
When you work with translation assignments or translation jobs, you can add files from a master entity (base translation job and translation project). In translation jobs and assignments, you will find additional button on the toolbar (Add file):

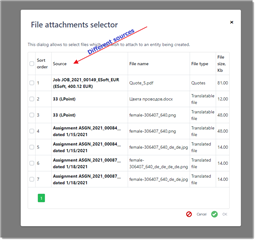
When you click this button, the system will display a dialog showing all files from base entities, including a column specifying a source where each file come from:

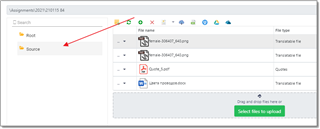
Select necessary files, click OK, and they will appear in a special folder named Source:

These file remain in their initial locations, this they will not be physically copied to the assignment folder. In the result, you can't rename, move or delete these files - only view them and send to vendors.
Syncing files
In addition to uploading files by dragging them into the file manager, you can copy them into a folder by using your default file manager. TBM will automatically find new files and add them to a corresponding folders in the File manager. When a file was automatically added, you can continue with setting its type, renaming, moving, etc.
In the same manner, if you delete a file from a hard drive, then next time when you open an entity where this file is attached, it will be removed from a list of files.
Files from dependent entities
When working with projects or jobs, file manager will display not only files from a project's or job's folder, but also files from nested assignments, along with their state in a form of tiny progress bar. This allows to track state of all project files in a single screen regardless how complex workflow you use. Even if you project has a lot of files and workflow requires a number of phases to pass, you can view the process and access all linked documents from a single file manager screen:

Progress bar displays dots which corresponds to a selected workflow. Each dot may have one of three colors: Green (finished), Yellow (in work) or Red (not started). Depending on a current state, the whole file row gets a corresponding color. Green file means that the file is ready and can be downloaded.
By hovering mouse pointer over a dot you will see a tooltip displaying a name of a phase and a list of documents where this file is used. You can click on a document number to view it in the popup window.
Service type column in the list displays name of a phase, and Language column provides information about target language.
After delivering a file in an assignment, the system will "know" that the file is ready and can be delivered to a client. To quickly select all deliverable files, click Quick select button on the toolbar and select All completed target files.

File versions
Sometimes files get new version when you start work on them. In this case you (or a client) can upload a new version of a file. To do this, select file and click ... to open a context menu, and then select Upload new version option. Select a file to upload it. It will appear in the list like this, informing you that a file has old versions:

Click on the row to expand and view older versions:

When a new version is uploaded, the system will check if any assignment is in work with a older version of a file. If such file will be found, TBM will send a notification to a vendor informing about new version. Additionally, it is always recommended to manually send a message to a vendor explaining why new version was uploaded.
Collecting and delivering files
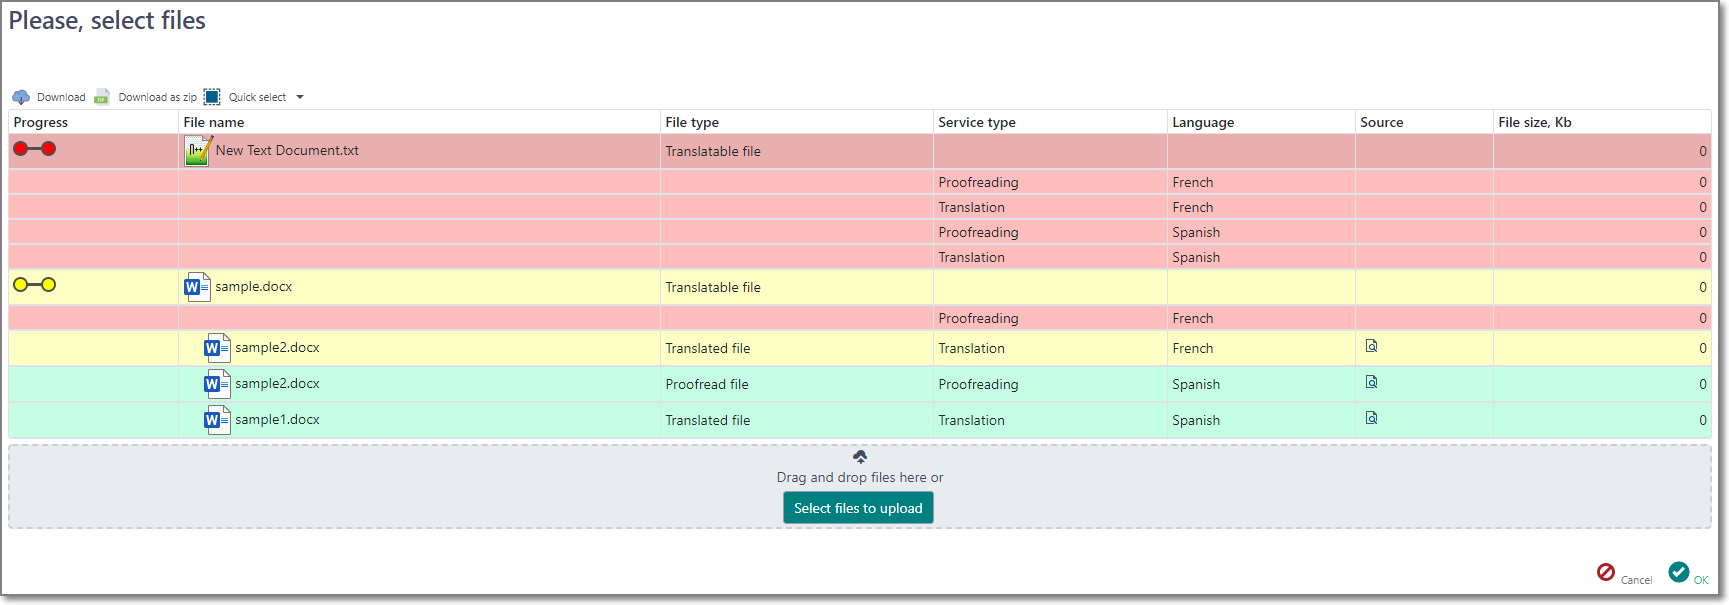
File manager allows to quickly check state of project files, and gather them from underlining jobs and assignments. When you create a job from a project, and then assignment from a job, you can include project files to created objects. In fact, files remain in a project folder, and in assignments they will be added as links (but not physically copied to an assignment folder). When a vendor delivers a file, delivered file becomes linked with a source file, so the system knows current stage of a file: if a work has been started or finished. When there are many files in a project, it becomes not very easy to track them all. Let's imagine that we have 2 files and 2 target languages, meaning that 4 files should be delivered to a client. Additionally, a project workflow has 2 stages: translation and proofreading, so the task is to deliver 4 files to a client after finishing Proofreading stage. To track file stages, click Collect files in the file manager of a project. See an example:

This screen shows that one file has not been started yet at all, while second file is in work, both in translation and proofreading stages. Spanish version is completely done and can be delivered, while French version is currently in translation phase. For documents which are in work or delivered, you can find Preview button, to quickly open a document where this file is added. In this list, you can select delivered files and click OK, and these files will be added to a project and become available for a client to download.
Hiding files
Hide from portals checkbox allows to hide selected files from the client or vendor portal, even if security system allows access to that file. This can be useful if a file was delivered, but requires manager's attention before passing it to a client, for example.


 Translate