The Reports Viewer Plus application is a very smart application that enhances the out of the box Reports View in SDL Trados Studio 2021. A brief summary of the benefits you can get from using this application are as follows:
- click on a report and it's rendered instantly
- you can edit the name of the Studio reports so they are easier to manage when you start to get a lot of reports in the list
- you can import an XML analysis file of some sort, along with an appropriate stylesheet, and attach it to your project
- you can define different stylesheets to be used for each type of Studio report and/or language so that they are automatically used in this view when you create a new project
Installation
Installation is best achieved through the Trados Studio 2021 appstore integration feature. You can find the installer here:
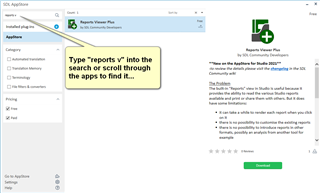
With this initial release the installer is an *.msi installer inside a zip which will be downloaded to the folder you have specified in your appstore integration settings (bottom left of the image above). Future updates will probably be an *.sdlplugin once the necessary enhancements have been made to SDL Trados Studio.
The installation will create a new View in Studio as shown below:
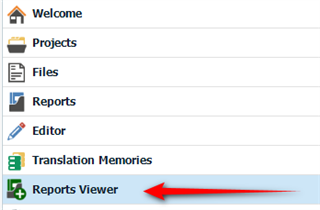
Using the Application
Settings
The settings are simple to use and provide good flexibility for customising your reports view. They can be found here in the application ribbon:
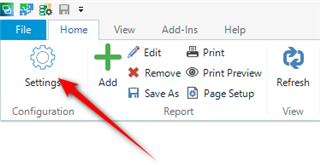
They consist of two tabs:
- General
- Custom Templates
General
The General tab looks like this:
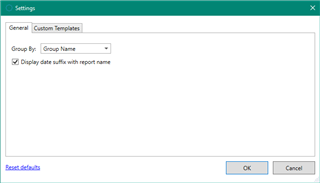
It provides options to set the default behaviour for:
- The way the reports are grouped in the navigation view:
- By Group Name (Analysis, Translate etc... or even a custom Group you have defined)
- By Language
- An option to decide whether or not you wish to include the date of each report added as a suffix to the report name, for example:
With the date:
Without the date:
Custom Templates
The Custom Templates tab looks like this:
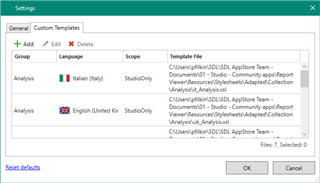
In here you have the ability to add/edit/delete as many custom templates as you like to control the way Trados Studio displays the reports you are using:
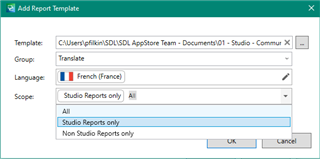
You can:
- add the location of the custom stylesheet you wish to use
- specify which Group the stylesheet should apply to
- Specify a specific language the stylesheet should apply to if you wish
- specify what kind of reports the stylesheets should apply to. So just out of the box Studio reports, some custom reports you are using, or all reports
So this can allow you to do something like this for example (please ignore the translation... it's machine translated and without proper context!):
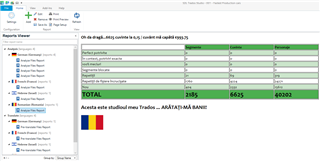
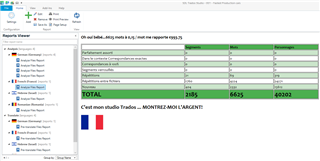
Here I created stylesheets to apply to the out of the box Studio Analysis report that apply to the FR and RO languages. These stylesheets are also not perfect as they were created quickly to demonstrate the point... you can find a couple here which help you if you wish to quickly see how the application works. These stylesheets are intended to be associated with a Studio Analysis Report only:
To use them just download and unzip to a folder of your choice, then change the path to the image. Very basic, but illustrates the point.
IMPORTANT NOTE: To be able to do this you do need to have some basic knowledge of working with XSLT. But if you have this you'll see this is quite a powerful feature. If you don't use custom stylesheets you'll still find this application is very useful because it loads the reports a lot faster than the out of the box Report Viewer in Studio.
Ribbon Features
The application has a number of useful features that are accessible via the ribbon.
Add
The Add button allows you to add, either by drag and drop or through selection, an XML report of some sort and an XSLT stylesheet that will render the XML in a readable format:
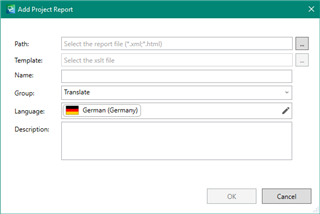
The Add feature allows you to add reports for anything you like so they are permanently linked to your active project. It's useful in at least the following circumstances:
- you are sent the Studio analysis report for a project you've been asked to work on.
- you are sent the analysis report for a project prepared with some other CAT tool.
Edit
The Edit feature allows you to rename the report and the description to something more useful:
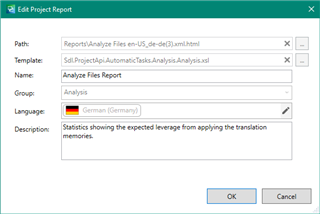
So you could do something like this for example:

This is much more helpful than the same name and then the date/time when the report was run.
Save As
The Save As feature allows you to save your report to share with others. Currently it only supports *.html, *.mht, *.txt:

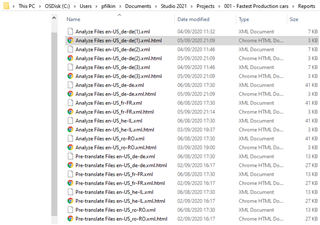
You get XML by default (of course) and this will be found in the reports folder, so you could also use your stylesheets to create pretty much anything you like if you have the XSLT knowledge to do this. These formats will probably extend to at least match the out of the box Report Viewer capability in due course.
Other icons/features
The other features, Remove, Print, Print Preview, Page Setup are all self explanatory and will not be covered in this article.
The application also supports a right-click capability:
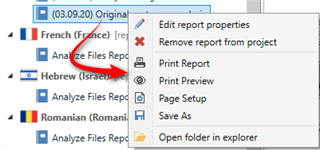
This provides you with fast access to the same features that are available in the ribbon plus the ability to "Open folder in explorer" which can be very useful if you want to use the XML reports or go back and find any of the rendered html reports. You'll also see that the reports are saved in the same location for the project:
Support
This is a reminder that all support requests for this app should be raised through the SDL Community forum for apps:

 Translate