
Overview
The Multilingual Excel filetype is designed to provide support for translating Excel files that support more than one language. The Excel file does have to be structured so that the content is within columns, but this is the typical layout for most files used in this context. Examples would be Excel files used for Gaming and Software localization, and files used for translating terminology. For example:
Image: Gaming Excel with a column for character length check, software key and comments from the developer:

Image: Terminology Excel with various columns providing context and columns supporting pixel length checks:

At a high level the filetype is designed to do several useful things:
- create a single multilingual filetype project from one source file for any number of target languages
- support embedded content
- support character length checks (can be language specific)
- support pixel length checks (can be language specific)
- generate a single multilingual excel file from the completed project
At a more detailed level the app supports many features the user will find helpful, and in many cases provides support for files that are not easily handled out of the box by the existing Excel filetypes.
Settings
File Type Information
Standard filetype interface providing minimal info about the filetype name, identifier and the type of files it supports:

Worksheet Mapping
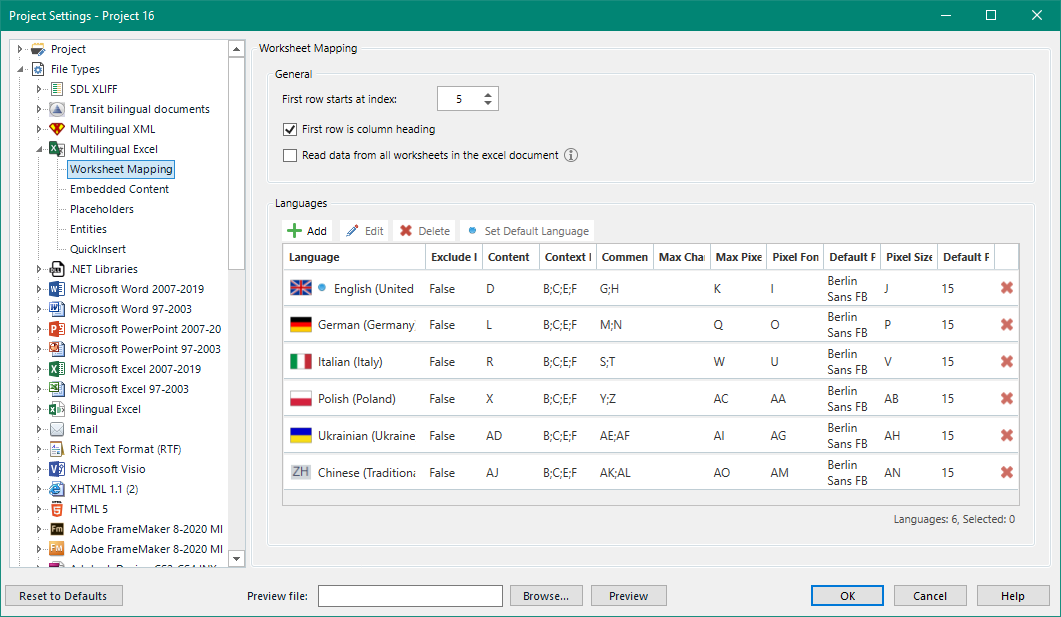
This page summarises the settings used to map the content from the excel file so Trados Studio knows how to handle it. It does this by mapping the column references in excel to the data being held in Trados Studio. This page, and all others have good mouse and keyboard support:
General
These type of excel files often contain instructions in the first few rows of the file. You specify here where the relevant data for the project starts, and if you have multiple worksheets in the file you have the option to read the data from all the worksheets as long as they follow the same layout for the content. So in this example the heading starts on row 5, and this row is checked to identify that it is the column headings and not translatable:

Languages
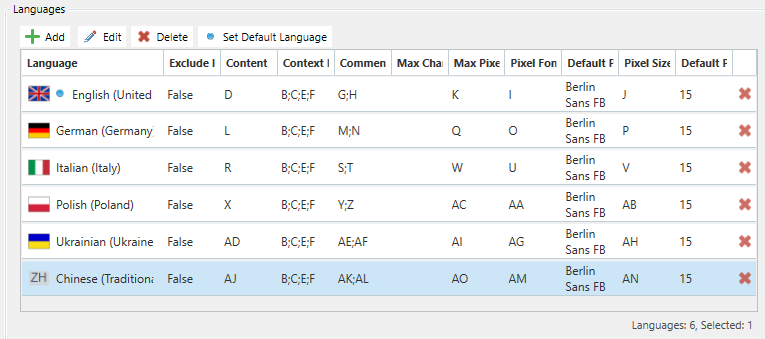
Using the tabs across the top you can Add as many language as you like, Edit them, Delete them, and Set Default Language. The Set Default Language feature is useful because it allows you to populate one language with all the settings so that all additional languages will use these settings when you add them. You can of course change the settings but this can significantly reduce the data entry time for files with many languages:
Edit Language
When you Add or Edit a language the following window will open allowing you to map the excel columns as required:
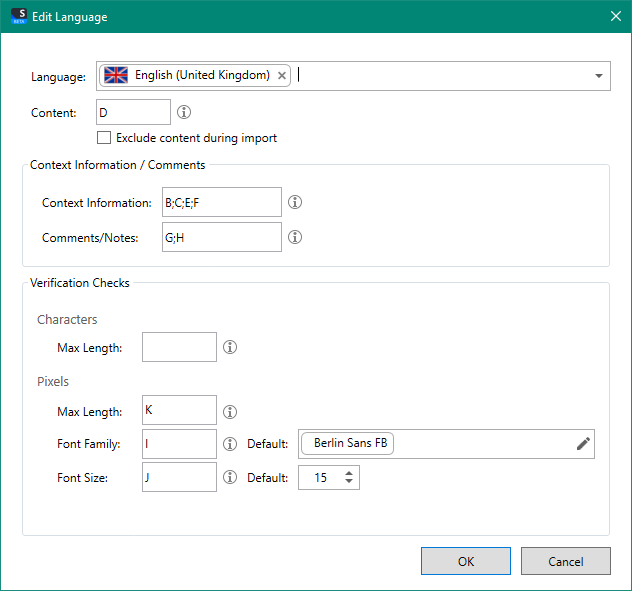
Language: one language can be entered in here either by selecting from a dropdown list, typing the language name in full (english (united kingdom)) or by using shortcodes (en-gb).
Content: the column name associated with the language content in the excel spreadsheet. In this example the english source content is in column D. Letters are not case sensitive as the application will correct them for you.
Context Information / Comments
Context Information: the column name associated with the context information in the excel spreadsheet, separated by a semicolon. You can add as many columns as you like in here and the information will be represented as Document Structure Information (DSI) in Trados Studio. For example, in this case four columns were added, B, C, E & F and they are all represented under the Location "Context". All segments will have the Location "Paragraph and "Multilingual Paragraph" by default:

Comment/Notes: the column name associated with the comments in the excel spreadsheet, separated by a semicolon. You can add as many columns as you like in here and the information will be represented as Comments in Trados Studio. For example, in this case two columns were added, G & H and they are all represented under the Comments:

An important point to note here is illustrated by segment #2. There are two comments, one source and one target. The source comment was taken from an entry in the excel spreadsheet in column G. The target comment was taken from column M which was specified in the language settings for German. You can filter the comments by source or/and target using the Trados Studio settings here:

As these have been added as Trados Studio comments they are also marked up in the Editor so you can see where the comments are:

This could be a little distracting, especially if you wish to add your own comments as they will not be easily picked out unless you make sure to use a different "severity" level for the colour:

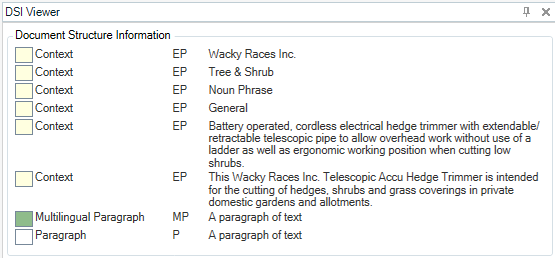
Or use the DSI Viewer from the appstore. This is probably a better option for viewing the context anyway as it will display all comments and DSI context in one view dynamically as you work through your file:

If you want a cleaner view in the editor then it may make sense to add all the comments as DSI instead. The DSI Viewer from the appstore has been updated to make sure it wraps text correctly when long sentences are used as Document Structure, so the view may be better like this:
Working in this way means you will not clutter the editing environment with comment markup, or mix and match by adding the source comments as real comments, and the target comments as DSI. The choice is down to personal preference and well supported with through Trados Studio and the apps possible through the integration framework.
Verification Checks
Note that these settings link to the Multilingual Excel Verifier which is covered later in this wiki. The reason they are here in the filetype is to avoid the need to have language specific verification settings as well as the language mapping in the filetype. This way all the mapping to content from the Excel spreadsheet is on the same page which significantly simplifies the creation and maintenance of the filetype settings.
Characters - Max Length: the column name associated with the maximum character length in the excel spreadsheet. This feature is a simple length check by counting the number of characters in the source and/or target segment and comparing the result with the number specified in the relevant Excel column. This can also be language specific, so you can have a different length for each language, and for each paragraph (Excel cell) being translated.
Pixels - Max Length: the column name associated with the maximum pixel length in the excel spreadsheet. This feature is also a length check, but this time the length is determined by the length of pixels occupied by the paragraph text in the source and/or target segment and comparing the result with the number specified in the relevant Excel column. This can also be language specific, so you can have a different length for each language, and for each paragraph (Excel cell) being translated. To calculate the pixel length you need to know the font size and also the font family since pixel length will be variable based on these values.
Pixels - Font Family: the column name associated with the pixel font family in the excel spreadsheet. In the example settings used in this wiki column I contains the value for the Font Family. However, you must always have a default font specified in case Trados is unable to recognise the type of font entered into the Excel spreadsheet. In this example the default is Berlin Sans FB. In the Excel file column I may contain the value Calibri for example. So the font used for the pixel verification will be Calibri. However, if Calibri is missing from a row, or if it's spelt incorrectly, then the default will be used. So it's important to make sure the values in the spreadsheet can be found by Trados Studio. This also means you must have the font installed on your computer because the application uses this to be able to calculate the pixel length.
Pixels - Font Size: the column name associated with the pixel font size in the excel spreadsheet. In the example settings used in this wiki column J contains the value for the Font Size. However, you must always have a default font specified in case Trados is unable to recognise the size of font entered into the Excel spreadsheet. In this example the default is 15. In the Excel file column J may contain the value 12 for example. So the font used for the pixel verification will be 12. However, if a value is missing from a row, then the default 15 will be used.

Embedded Content
f